Quick tour (2 minutes)
- Sign in at flashcardpro.app (new? join your school or sign up on your own first). More
- Pick a deck in Active Deck. If you do not have one yet, tap 📚 Add a deck from the library right under it, or open My Cards to import a CSV file or make your own. More
- Quiz yourself. Right answers move a card up a box; wrong answers send it back to Box 1. More
- Learn a little at a time. Use Split Deck to study just part of a big deck, then add more pieces as you get comfortable. More
- Want to read the answers first? Switch to Study Mode. More
Anywhere in the app you will see small ? circles next to headings. Tap one for a short explanation, and use Read more to jump to that part of this guide. The ❓ Help button at the top of every screen opens this guide on the page for the screen you are looking at.

Signing in, and forgetting your password
Getting an account
- Your school uses FlashcardPro: on the home page tap Join your school, pick your school, then type your name, your school email and a password. There is nothing to verify: you are signed in and studying right away. It is free for you. Your school admin can also add you; if they gave you a password (often your student ID) you can sign in with it straight away at flashcardpro.app/login. Otherwise use Join your school or Forgot password.
- Studying on your own: tap Study on my own, type your name, email and a password, and start studying. Free for 12 months, then $5 a year.
- Passwords need at least 4 characters (school admins need 8). After 5 wrong passwords in a row the account is locked for 10 minutes; wait, or use Forgot password.
Signing in
Go to flashcardpro.app, tap Sign In, and type your email and password. Your decks, boxes, topics, splits and settings are saved to you, so they follow you to any device.
Forgot your password?
- On the sign-in page tap Forgot password?.
- Type the email address you signed up with and send the link.
- Open the email (check the spam folder if you do not see it after a few minutes) and tap the link.
- Choose a new password, type it twice, and save it. You are signed in.
Signing out
Tap your name at the top and choose Sign out when you share a device. Anything you answered while offline is sent to your profile the next time you sign in online.
How the boxes work
This app uses the Leitner box method, a simple way to remember things for a long time. Every card lives in one of five boxes:
| Box | What it means |
|---|---|
| Box 1 | New cards, and cards you just got wrong. They come up the most often. |
| Box 2, 3, 4 | Cards you got right. Each right answer moves a card up one box, and it shows up less often. |
| Box 5 | Cards you know well (“mastered”). They come up the least. |
Right answer → the card moves up one box. Wrong answer → the card goes back to Box 1 so you see it again soon. Over time you spend your effort on the cards you find hard.
Install it like an app
- iPhone / iPad (Safari): tap the Share button, then Add to Home Screen.
- iPhone / iPad (Chrome): tap the Share button at the right end of the address bar, then Add to Home Screen (iOS 16.4 or newer).
- Android (Chrome): open the menu (⋮), then Install app or Add to Home screen.
- Computer (Chrome or Edge): click the install icon at the right end of the address bar.
Installed, it opens full screen and works offline. If you ever think you are seeing an old version after an update, close the app and open it again (or refresh the page).
The Study screen
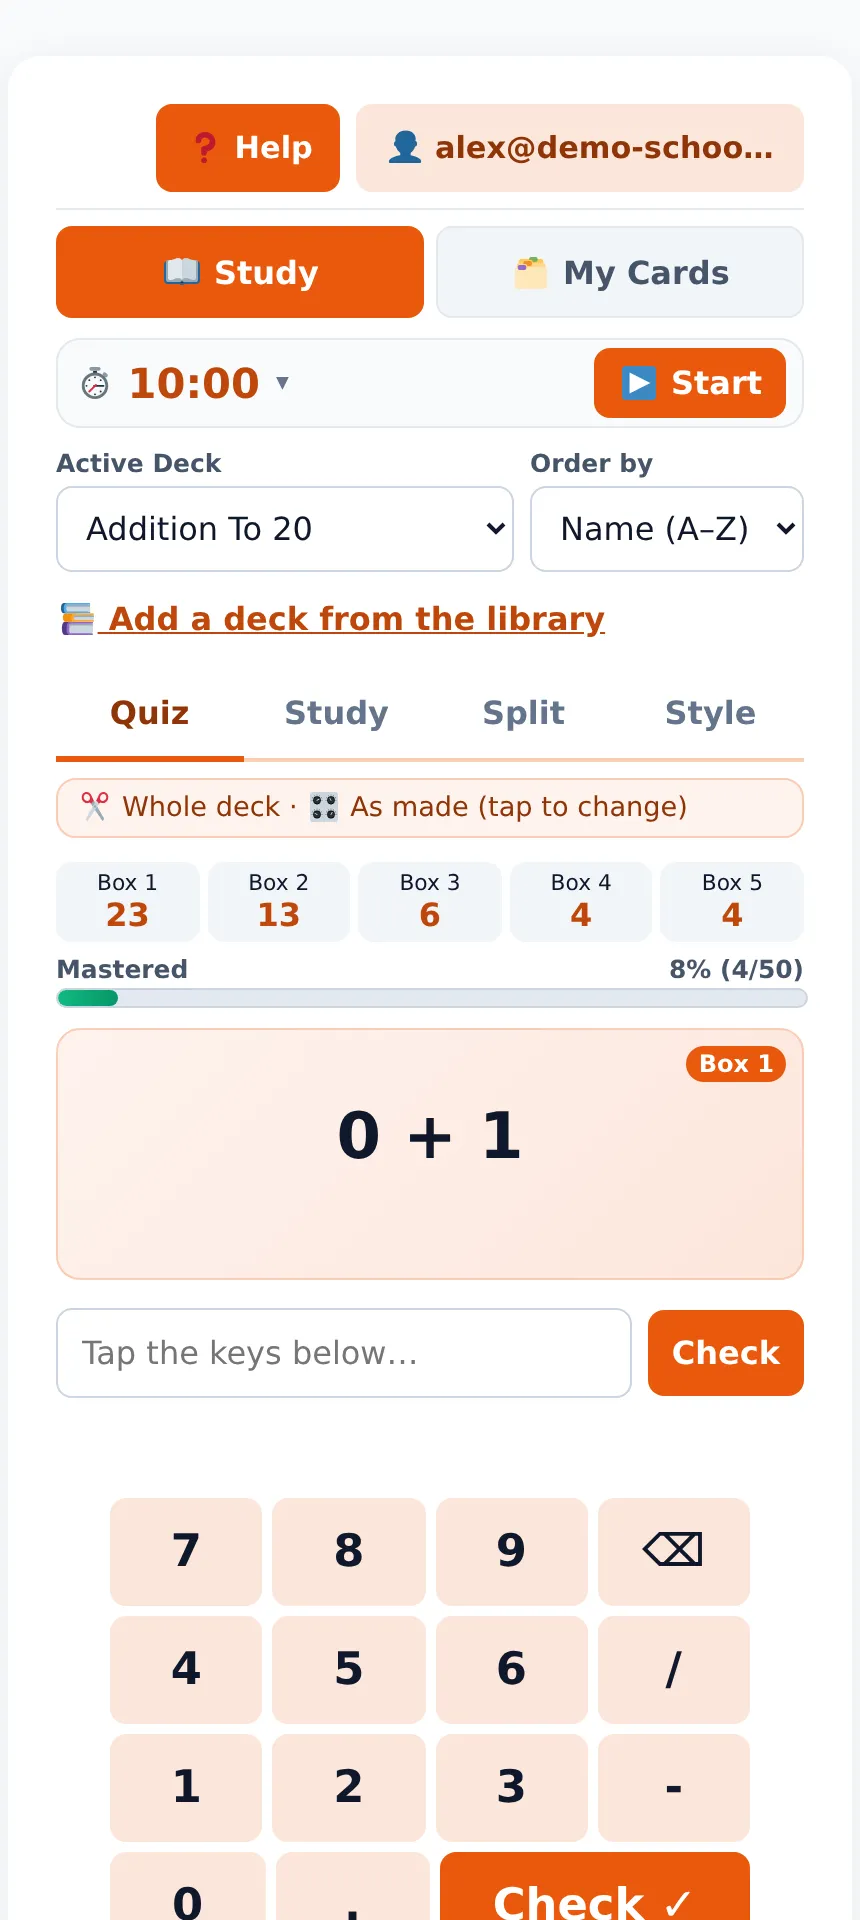
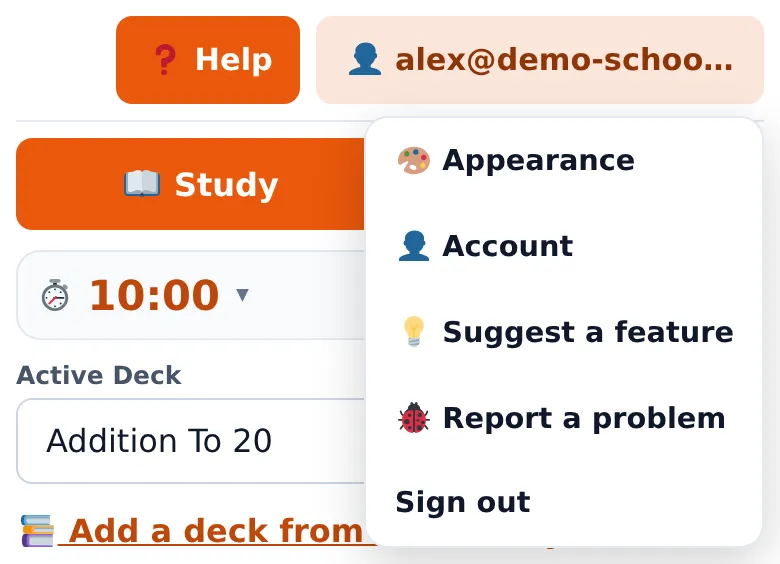
- Top row: ❓ Help and your name (👤 sam ▾). Tap your name for Appearance, Account, Suggest a feature, Report a problem and Sign out (teachers and school admins also see Share decks with my school).
- Study / My Cards: switch between studying and managing your decks.
- Timer: a small chip. Tap the time to choose a length; ▶ Start is always there. More
- Active Deck: the deck you are studying. Right under it, 📚 Add a deck from the library is a quick link to the library. Order by lists your decks by name, by subject, by grade or by the teacher who shared them. Grade and Teacher only appear when some of your decks have a grade or came from a teacher.
- Four tabs: Quiz, Study, Split and Style. Quiz · Study · Split · Style
- Summary line (when you are not on Split): shows what you are working on, for example “Endocrine System · 5 of 14 cards · Multiple choice”. Tap it to change the split.
- Boxes and Mastered: how many cards are in each box, and the share you have mastered. More
Names at a glance
This guide sometimes uses the full names. On the screen some of them are shortened:
| In this guide | On the screen |
|---|---|
| Study Mode | the Study tab |
| Split Deck | the Split tab |
| Quiz Style | the Style tab |
| Card Management | the My Cards tab, with Decks · View · Topics inside |
Quiz
On the Quiz tab you are asked one card at a time. Cards from Box 1 come up most often, and cards from Box 5 least often.
Three kinds of questions
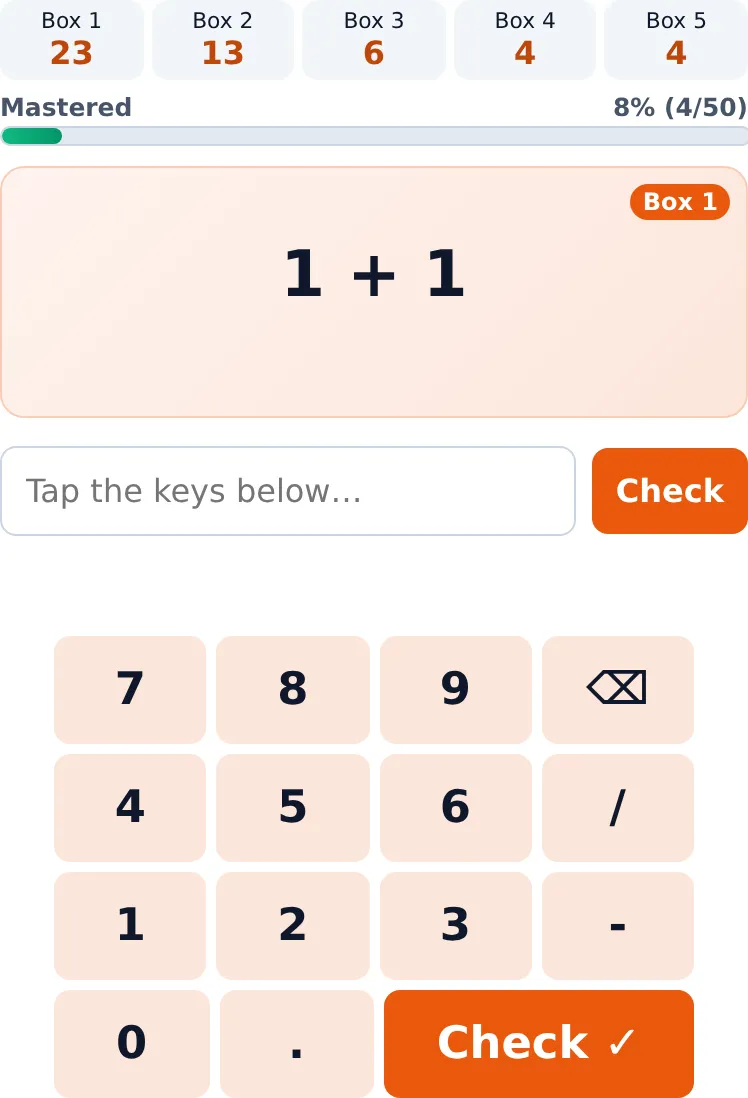
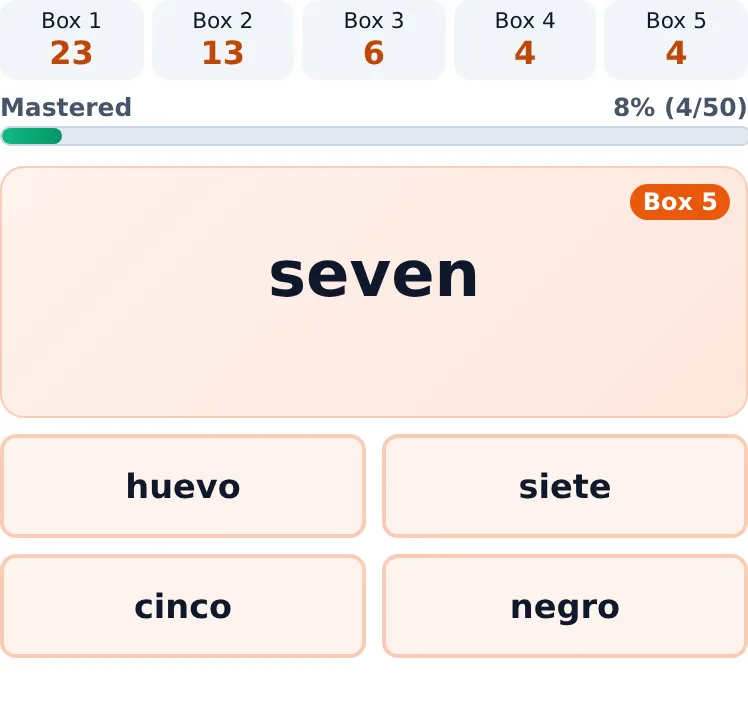
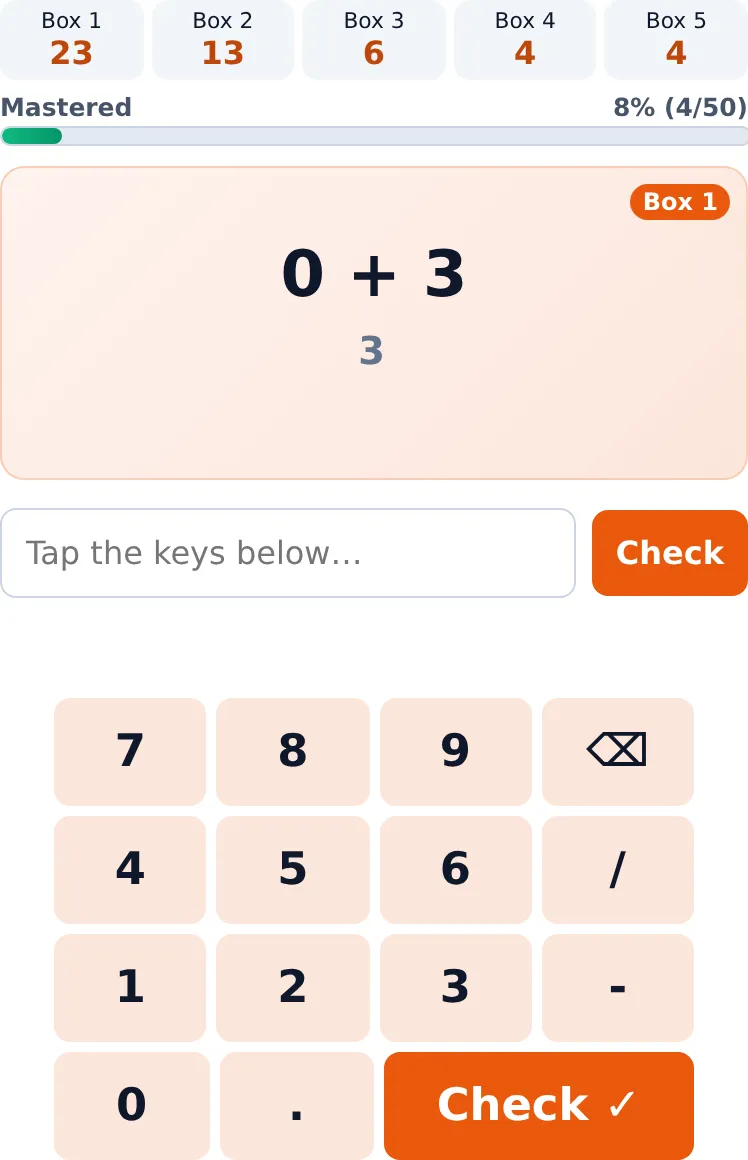
Capital letters and extra spaces do not matter when you type an answer. You can also change how every card is asked in Quiz Style.
After you answer
- Correct! The card moves up one box.
- Not quite. The card goes back to Box 1, and a thin pink strip at the bottom of the question card shows the correct answer (and the question) for about ten seconds. The space is always kept free, so nothing jumps around while you read it.
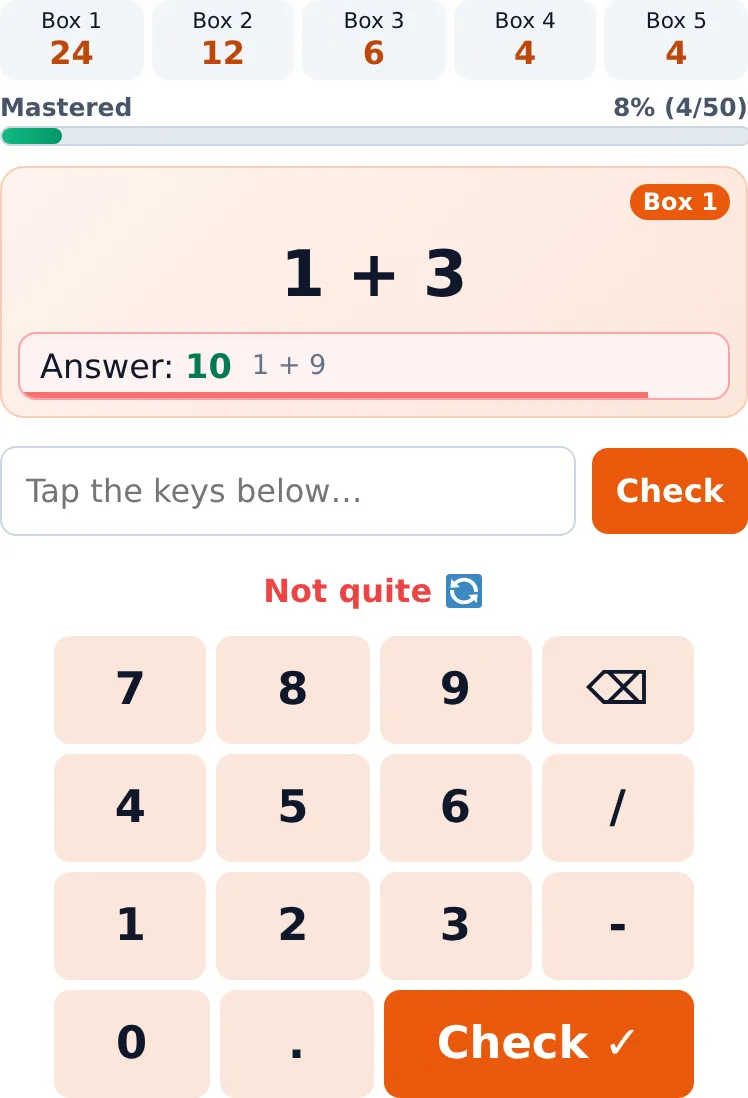
Boxes and Mastery

The five numbers show how many cards are in each box right now. The Mastery Progress bar under them shows the share of cards that have reached Box 5. When every card is in Box 5, you get a celebration!
If you are using a split, the boxes and the bar count only the cards in the pieces you have on, so finishing a piece shows 100%. When that happens, a green 🎉 Piece mastered! message offers ➕ Add the next piece or Next piece only with one tap.
Quiz Style
The Quiz Style tab changes how every card in the deck is asked, without changing the cards or your boxes. Try multiple choice today and typing tomorrow.
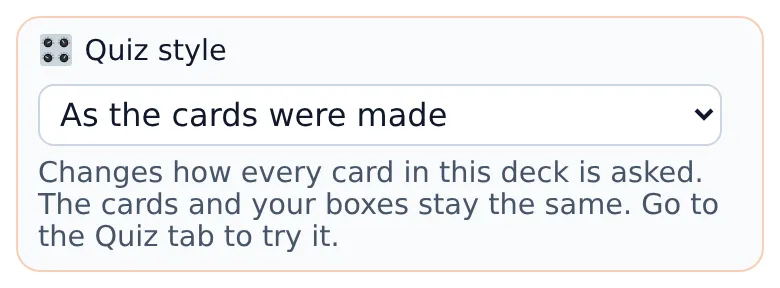
| Style | What you get |
|---|---|
| As the cards were made | Each card is asked the way it was written. |
| Multiple choice | Every card becomes multiple choice. Cards without their own wrong answers borrow wrong answers from the other cards in the deck (nearby numbers for number answers). A very small deck may give weak choices. |
| Type the answer | Every card is typed, even ones that were made as multiple choice. |
| Fill in the blank (with letter hints) | You type the answer, and the first letter plus one line for each other letter is shown, like P _ _ _ _ _ _ _. |
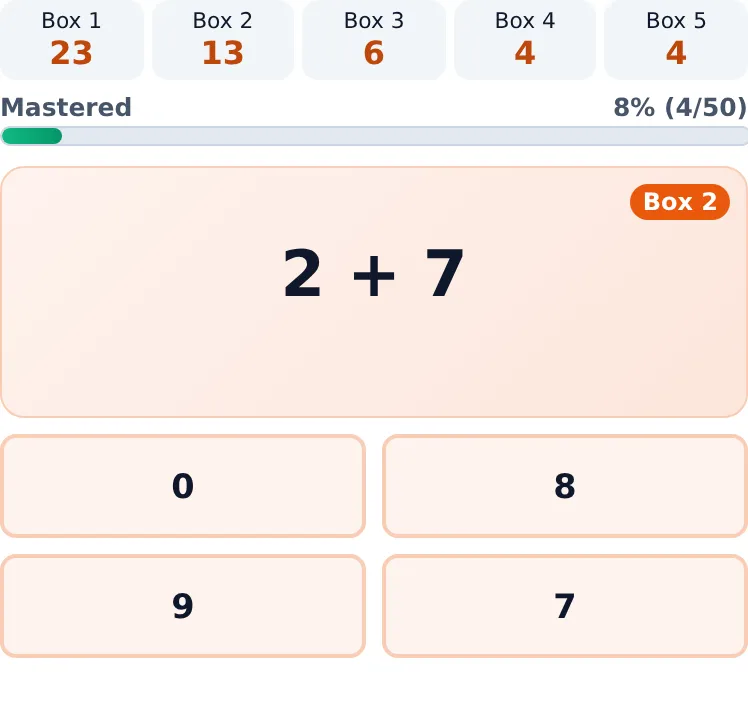
Study Mode
Study Mode lets you read the cards with the answers showing, before you quiz yourself. Nothing here counts toward your boxes. Tap Study Mode under the deck picker.
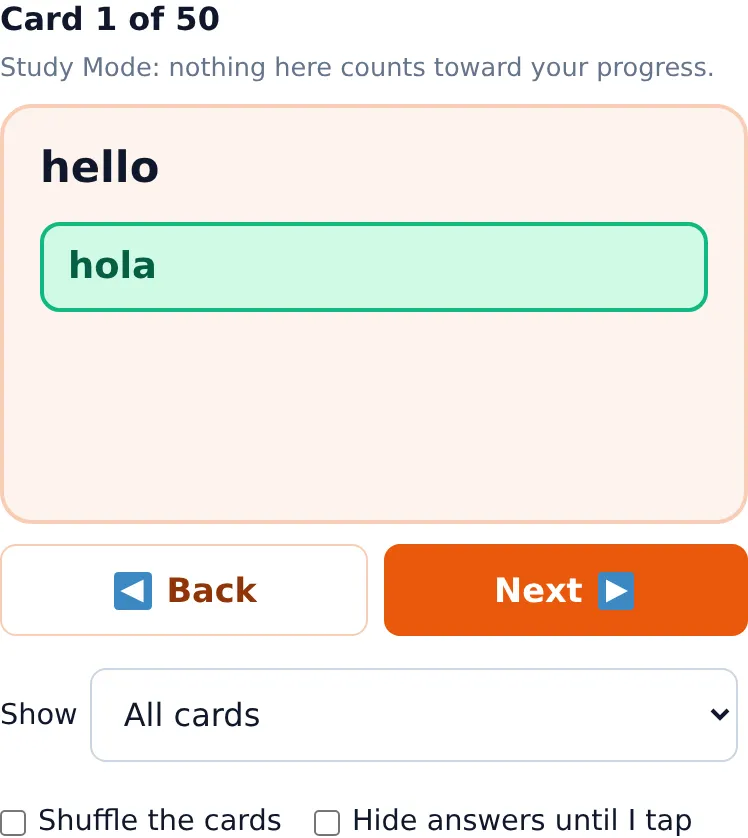
- Tap Next ▶ and ◀ Back, press the ← → arrow keys or Space, or swipe on a phone.
- Fill-in-the-blank cards show the missing word filled in. Multiple choice cards list all the choices with a ✔ on the right one.
- Shuffle the cards mixes the order.
- Show picks which cards to read: All cards, Cards I don't know yet (Box 1), Cards I'm still learning (Boxes 1–2) or Cards I miss most. The last one lists the cards you have got wrong in Quiz, the most missed first (it fills up as you quiz). It works together with Split Deck and the grade filter.
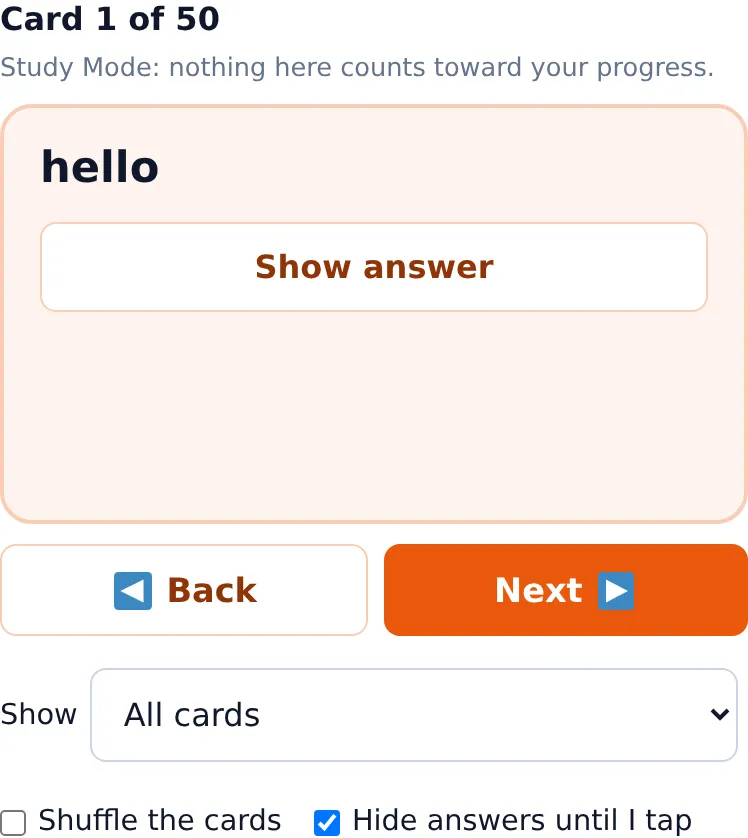
- Hide answers until I tap lets you think first: the first tap shows the answer, the next tap moves on.
- At the end you can Go through again or Try Quiz mode.
Split Deck
Learning a 100-card deck all at once is hard. Split Deck cuts a deck into smaller pieces so you can learn a few cards at a time, then add pieces together as you get comfortable. For example: study the first 10 cards, then the next 10 on their own, then both pieces together (20 cards).
The split works in both the Quiz and Study Mode. Open the Split Deck tab in either one. It is the same panel, so you always practise the same cards you study.
Step 1 — choose how to split
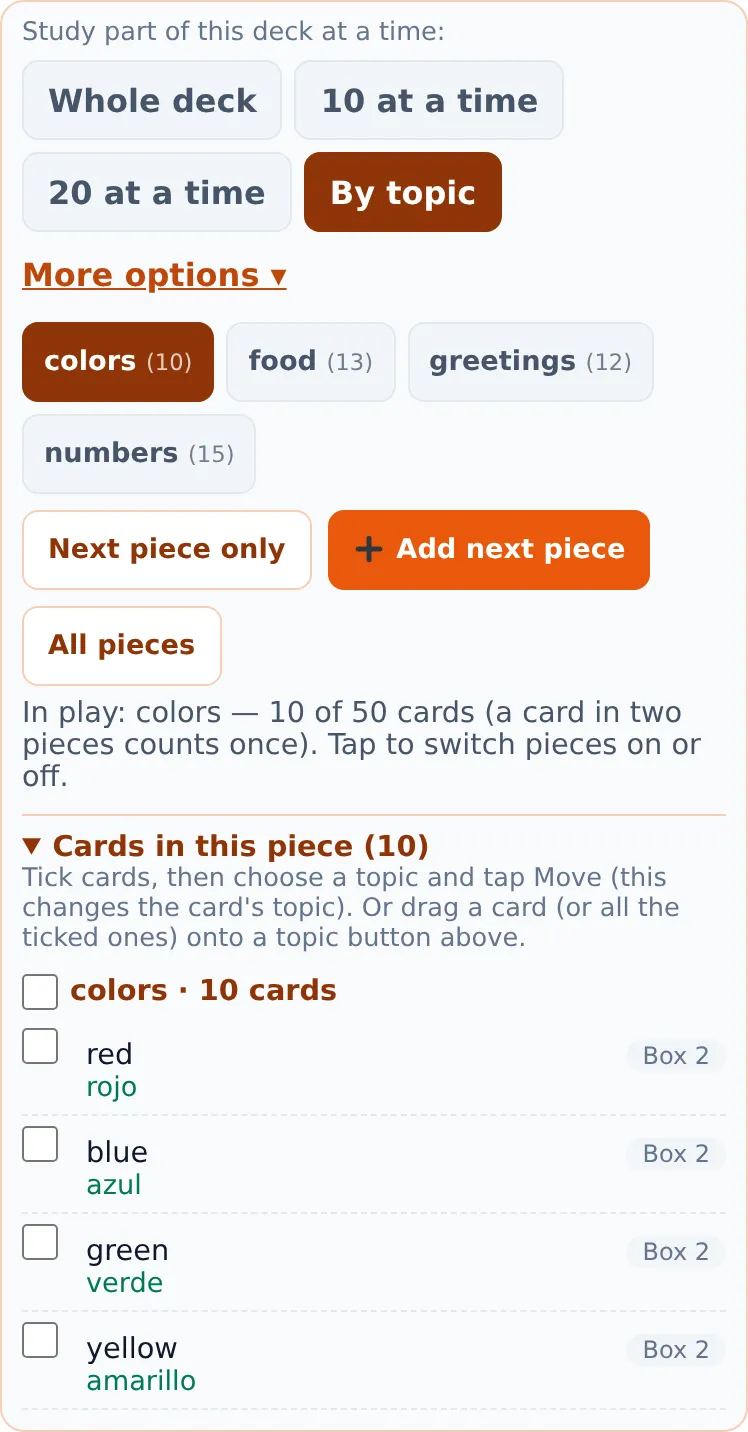
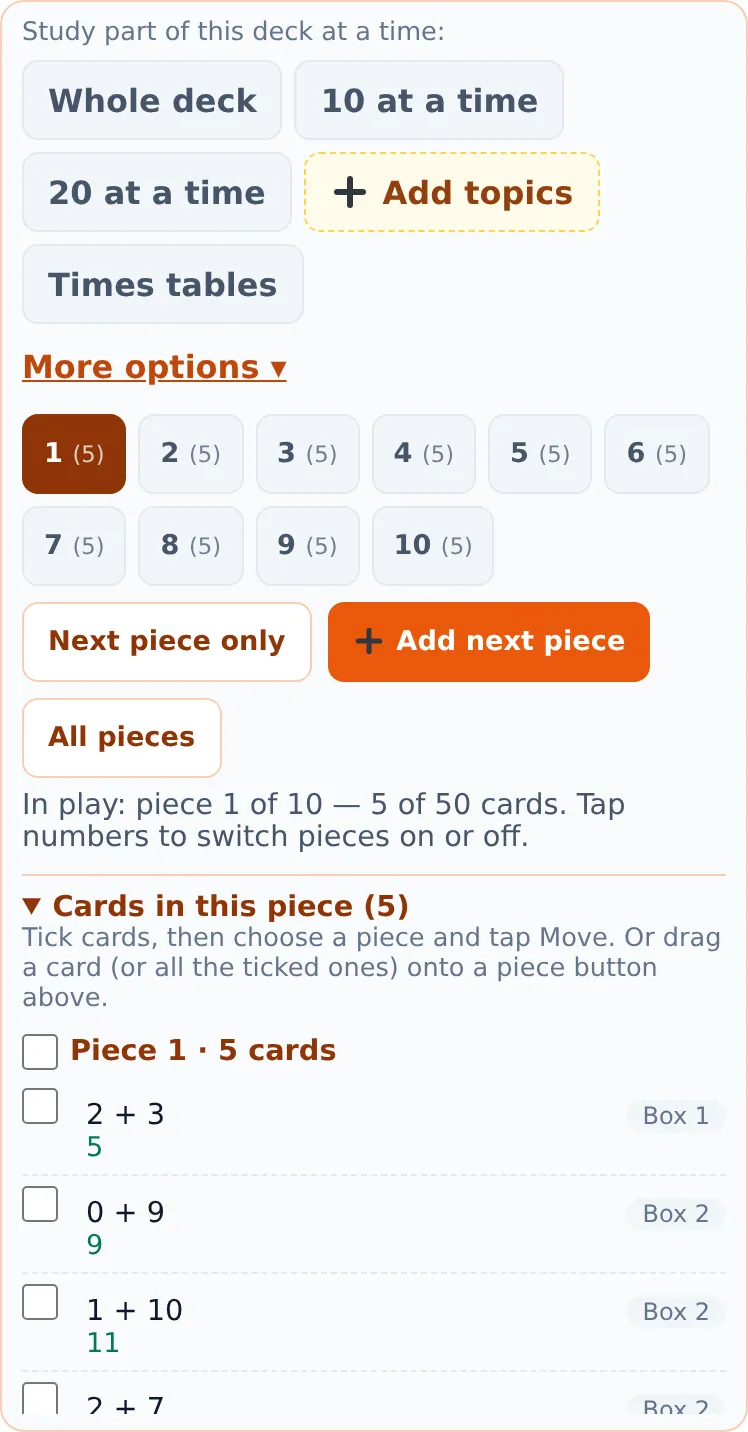
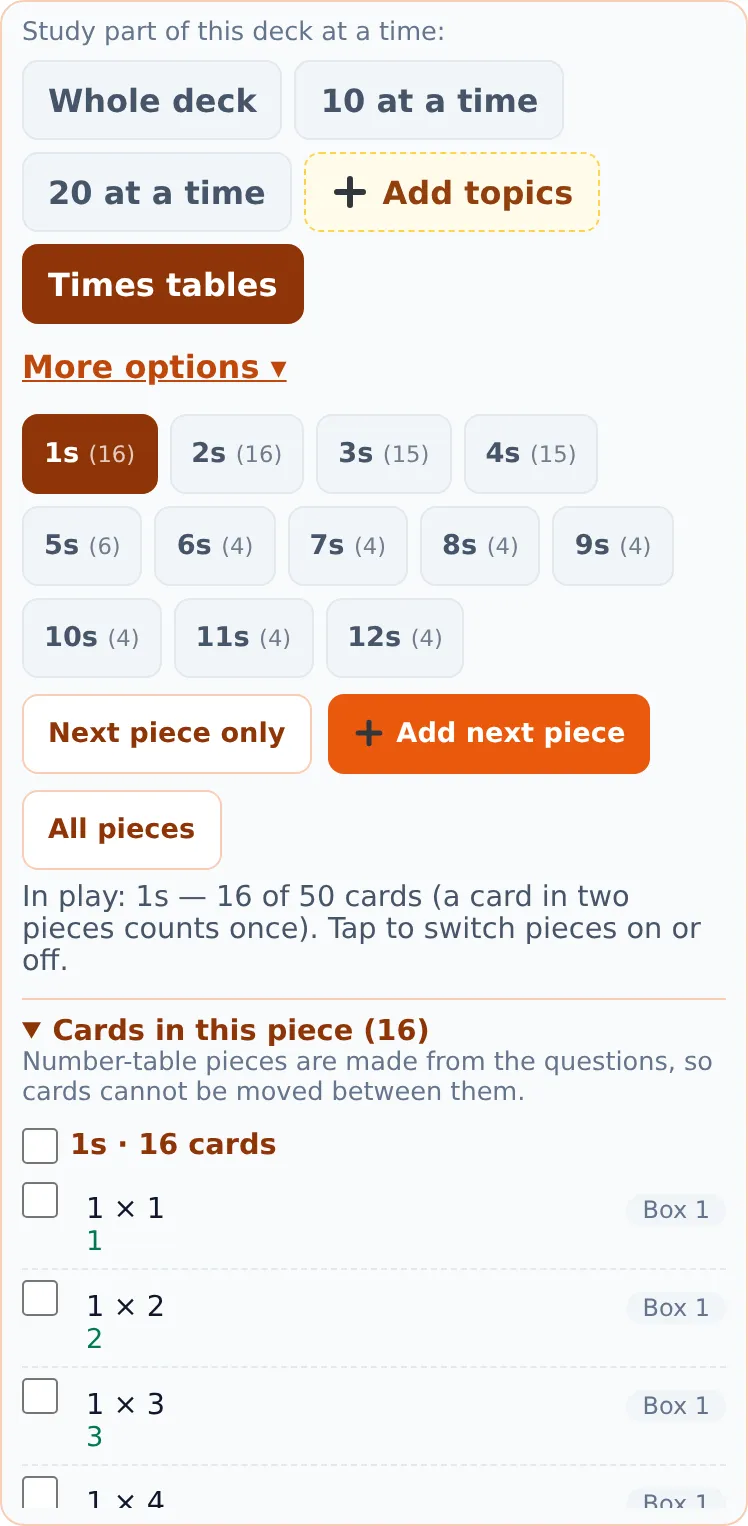
Split starts with a few one-tap choices: Whole deck, 10 at a time, 20 at a time, By topic, and Times tables (only for decks of cards like 6 × 7). The one you are using is highlighted. Tap More options for everything else, which is the Split this deck drop-down:
| Choice | What it does |
|---|---|
| Whole deck (no pieces) | Turns splitting off. |
| 2 to 20 pieces | Cuts the deck into that many equal pieces. |
| 5 to 50 cards each | Makes pieces of a set size (the last one may be smaller). |
| or your own size | Type any size, such as 7, in the box and tap Set. |
| By topic / chapter (book order) | One piece for each topic in the deck, in the order you set. See Topics. If the deck has no topics yet, the button says ➕ Add topics and takes you straight to the Topics tool for that deck. |
| By number table (2s, 3s, 4s…) | For times-table style decks (cards like 6 × 7). One piece for each table: the 2s table has every card using the number 2. For ÷ and −, the table is the number you divide or take away. |
Step 2 — switch pieces on
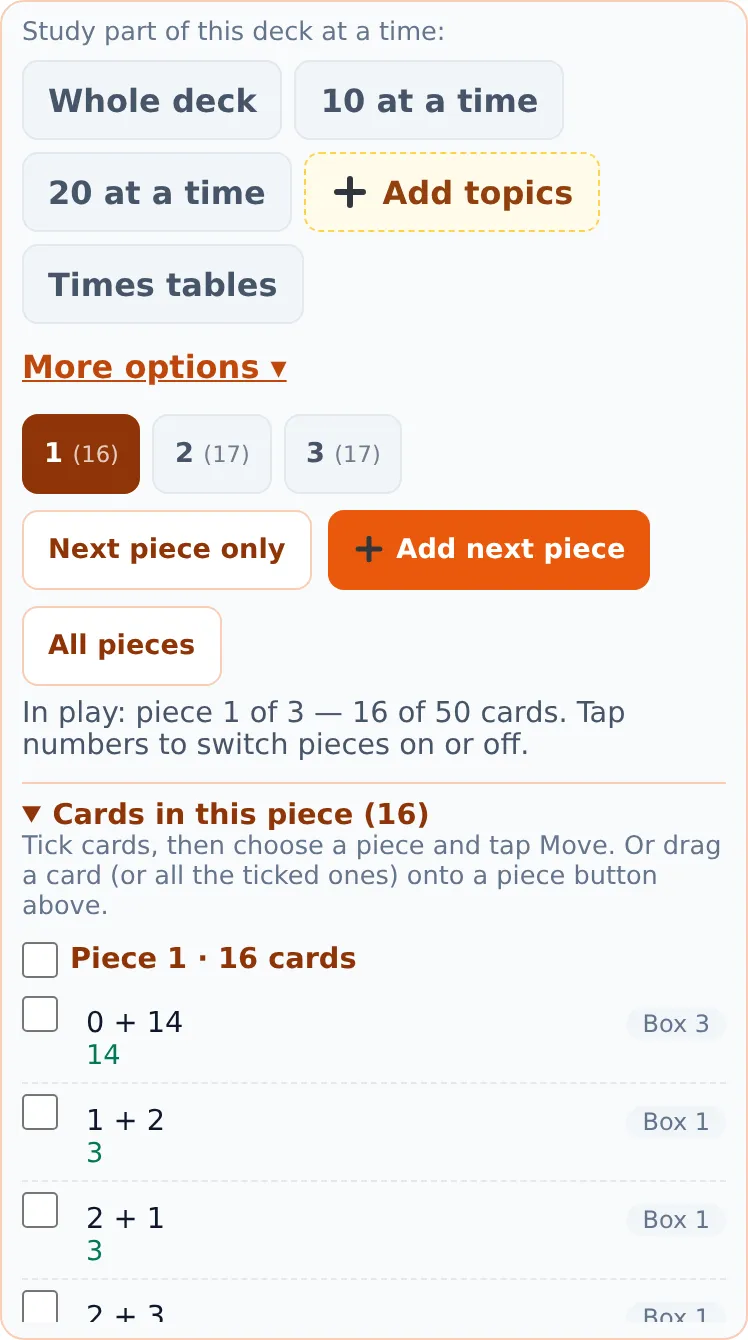
- Tap a numbered button (or a topic name) to switch that piece on or off. At least one piece stays on. The number in brackets is how many cards are in it.
- Next piece only moves to the piece after the highest one that is on, by itself.
- ➕ Add next piece keeps what is on and adds the next piece, so your set of cards grows.
- All pieces switches every piece on.
A sentence under the buttons says what is in play, for example “In play: pieces 1–2 of 5 — 4 of 10 cards”.
Mix up the cards
For splits by number or size, 🔀 Mix up the cards (on by default) makes each piece a random selection from the whole deck, so the pieces are not just “the next cards in order”. The mix stays the same each time you come back. Tap Reshuffle for a new mix, or untick the box to use the cards in the order they were added.
See the cards in each piece
Below the buttons, Cards in these pieces lists every card in the pieces that are on, grouped by piece, with its answer and box. It updates as you switch pieces on and off. To look at a piece, switch it on.
Move cards between pieces
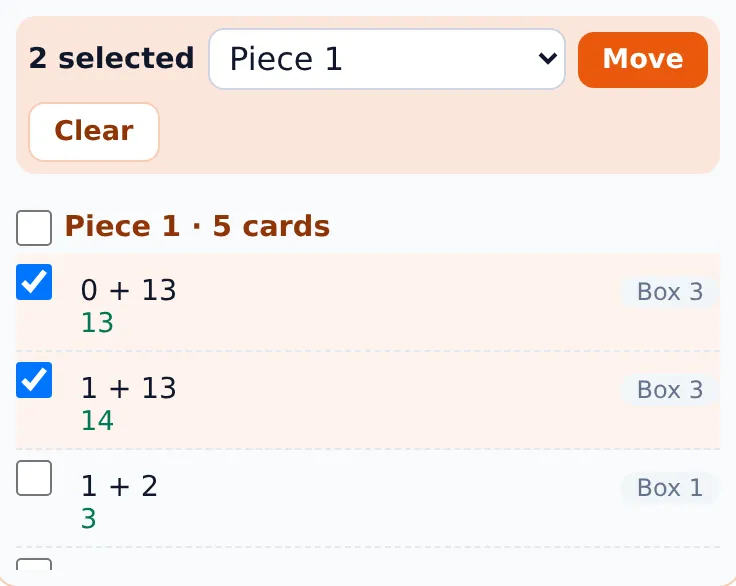
- Tick and move: tick one or more cards (or the box next to a piece's name to tick them all), choose where in Move to, and tap Move.
- Drag and drop (computer and tablets with a mouse or pen): drag a card onto a piece button. If the card you drag is ticked, every ticked card goes with it.
- ↩ Undo move puts the last move back (for number and size splits).
| If the deck is split by… | Moving a card… |
|---|---|
| number or size | is remembered for that deck, so a piece can end up bigger or smaller than the others. Mixing again starts the pieces fresh. |
| topic | changes the card’s topic (needs internet). You can undo it with ↩ Undo on the deck in Card Management. |
| number table | is not possible, because the pieces come from the questions themselves. |
Where your split is saved
Your split, the pieces you have switched on, any moved cards and your quiz style are saved to your profile, per deck. They are still there after you sign out and on other devices.
Study timer
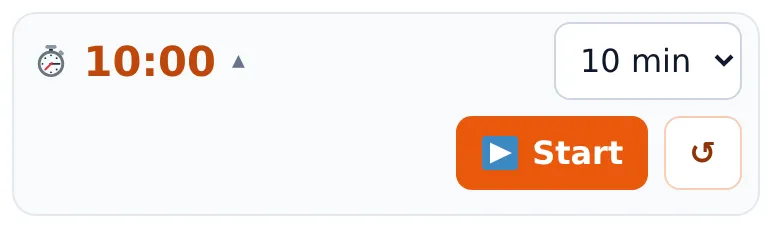
The timer is a small chip under the Study / My Cards buttons. Tap the time to choose a length (and to see the reset button), then tap ▶ Start. Pick a length (for example 10 minutes), tap ▶ Start, and it counts down while the app is open. ↺ resets it. When time is up, a message appears with OK and Start again, and says how many cards you answered and how many were right. The timer pauses if you leave the app, and it remembers your chosen length.
Appearance (text size, font, color)
Tap your name at the top (👤 sam ▾) and choose 🎨 Appearance. Tap it again, or tap your name again, to close the panel.
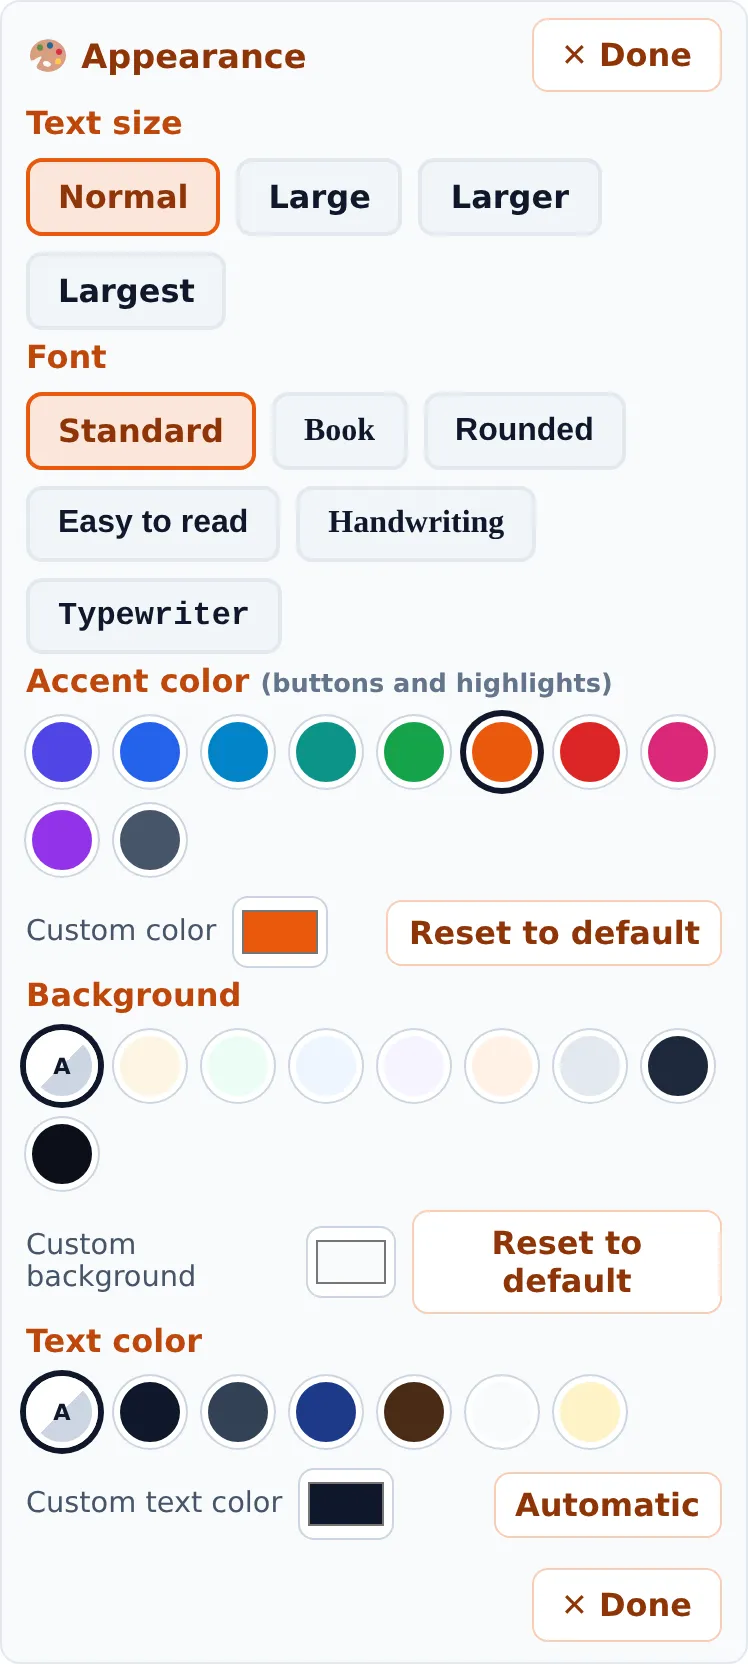
- Text size: Normal, Large, Larger or Largest, to make everything easier to read.
- Font: Standard, Book, Rounded, Easy to read, Handwriting or Typewriter. The font is used everywhere, including the answer box and buttons.
- Color: pick a swatch or use Custom color. Reset to default goes back to the original.
Your choices (text size, font and color) are saved to your profile and follow you to your other devices. Fonts come from your device, so “Handwriting” can look a little different on different phones.
Account (and sign out)
Tap your name at the top (👤 you@school.org ▾) and choose 👤 Account. Appearance and Account are two separate sections. Each has a ✕ Done button, and opening one closes the other.
- It shows who you are signed in as and your school (or "My account" if you study on your own).
- The same menu has 💡 Suggest a feature and 🐞 Report a problem (see below), and, for teachers and school admins, 🏫 Share decks with my school (see Your school's own decks).
- Billing opens your payment page. School students never pay: the school does. Students on their own pay $5 a year after the free 12 months.
- Fair Use Policy explains the limits that keep FlashcardPro fair for everyone.
- Sign out is in the same menu. Use it when you share a device.
Card Management overview
Tap 🗂️ Card Management (My Cards on the screen) at the top to make and change decks. It has three tabs:
| Tab | Use it to… |
|---|---|
| 📚 Decks | ① add a deck from the library (public decks, or decks your school shares), and ② see My decks: group them by subject and grade, view, download, replace or delete them, suggest one for everyone. The buttons above the list make a new deck or add cards (blank deck, one card at a time, CSV file, or your notes), merge decks and make cards multiple choice. |
| 📋 View | see every card in a deck, search it, and delete cards. |
| 🏷️ Topics | organise topics, including suggesting topics (AI). |
The AI helpers sit right next to the things they change. Where to find each one.
Offline: Decks and View work offline, and you can still make a blank deck. The library, adding cards, Topics, merging and the AI helpers need an internet connection.
On the Decks tab the two sections start folded up under their headings to keep the page short. Tap a heading (▸) to open it. Only one is open at a time: opening another folds the first, and tapping an open heading folds it again.
Decks
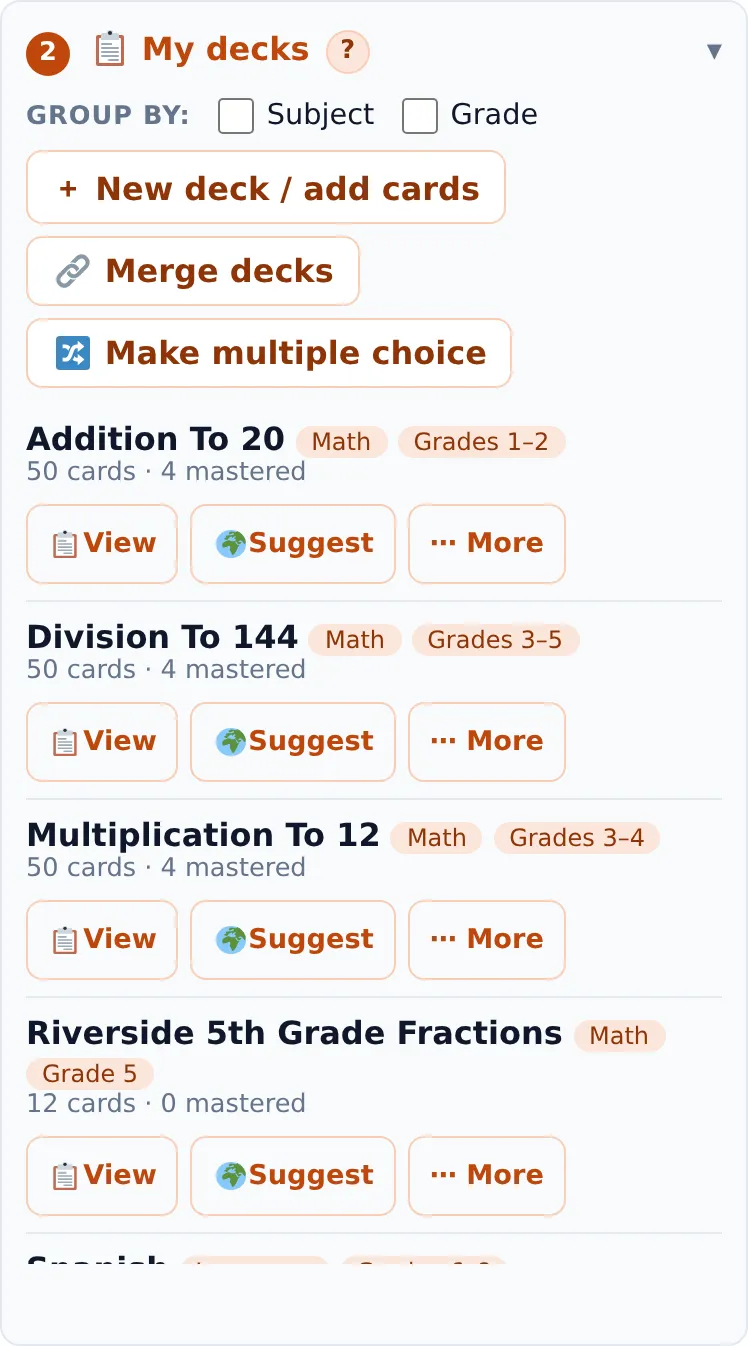
My decks
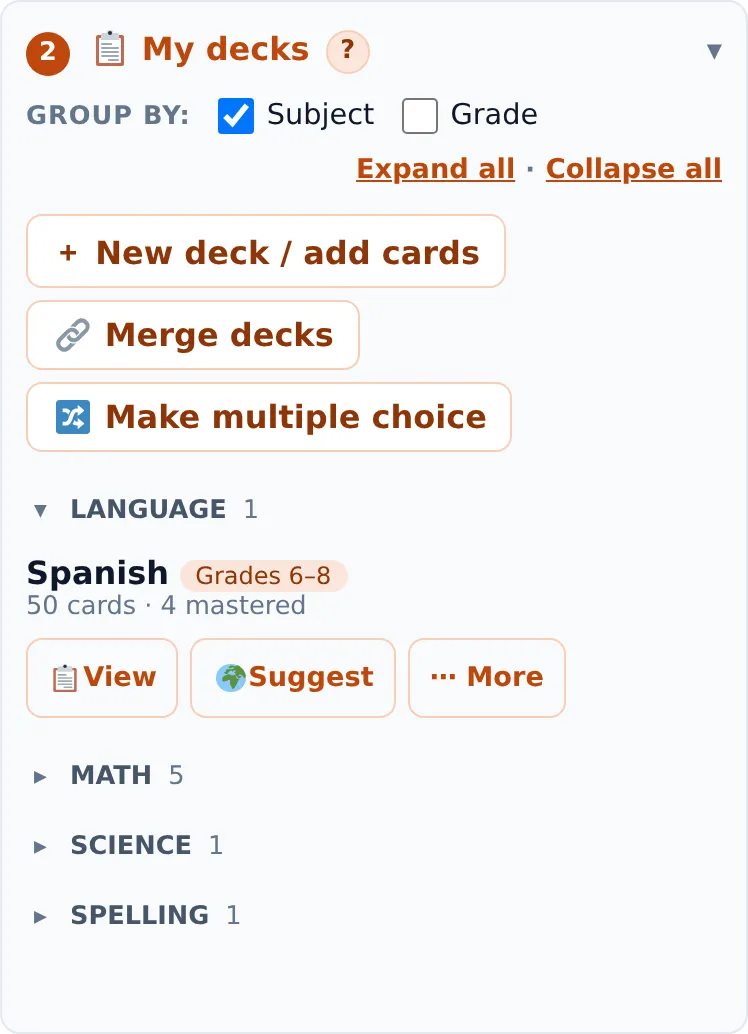
Group by: above the list, tick Subject, Grade, or both (subject first, then grade inside it). Leave both empty for a plain A–Z list. Each group starts folded (click its heading to open it; the groups you leave open stay open). Expand all and Collapse all open or close every group. Your choices are remembered on that device. A deck gets its grade from the library deck it came from, or from the grade column on its cards.
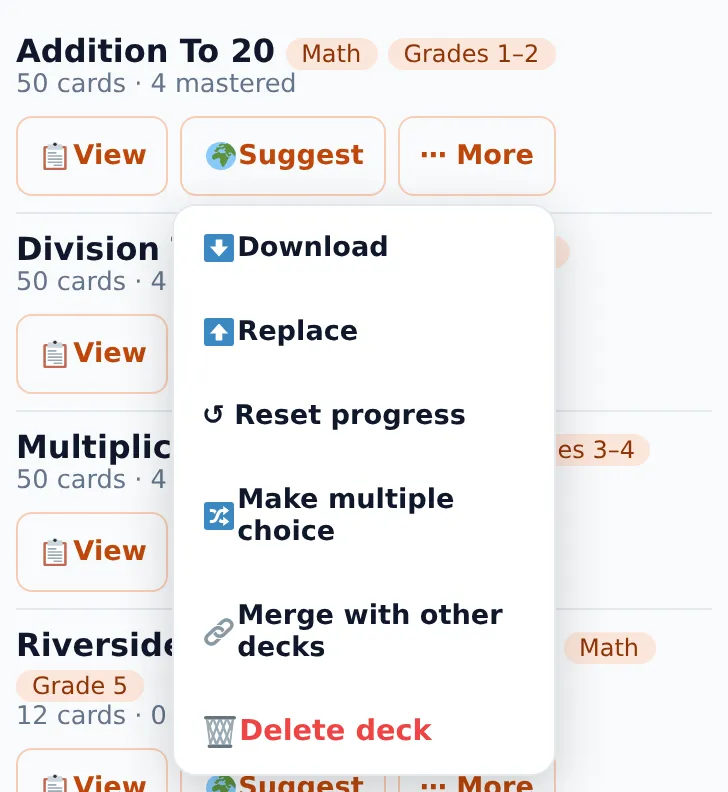
Each deck shows how many cards it has and how many are mastered. Under each deck you see 📋 View, 🌍 Suggest and ⋯ More. The ⋯ More menu holds Download, Replace, Reset progress, Make multiple choice, Merge with other decks, Undo and Delete deck. What each does:
- 📋 View opens the deck in View Deck.
- ⬇ Download saves the deck as a CSV spreadsheet, including each card’s box and topic.
- ⬆ Replace uploads a CSV to replace the deck’s cards. Cards whose question matches keep their progress; cards not in the file are removed. It asks you to confirm first.
- ↺ Reset progress moves every card back to Box 1 so you can study the whole deck again from the beginning. The cards themselves do not change. It tells you how many cards will move and asks you to confirm, and it is greyed out when every card is already in Box 1. Use ↩ Undo to put the boxes back.
- ↩ Undo appears after a bulk change (replace, reset progress, make multiple choice, delete cards, topic changes) and puts the deck back the way it was. One step is kept per deck.
- Delete removes the whole deck. This cannot be undone.
Suggest your deck for everyone
Made a deck other students could use? Tap 🌍 Suggest on that deck. A small form opens where you can choose the name everyone will see, the subject, and write a short note for the person who reviews it.
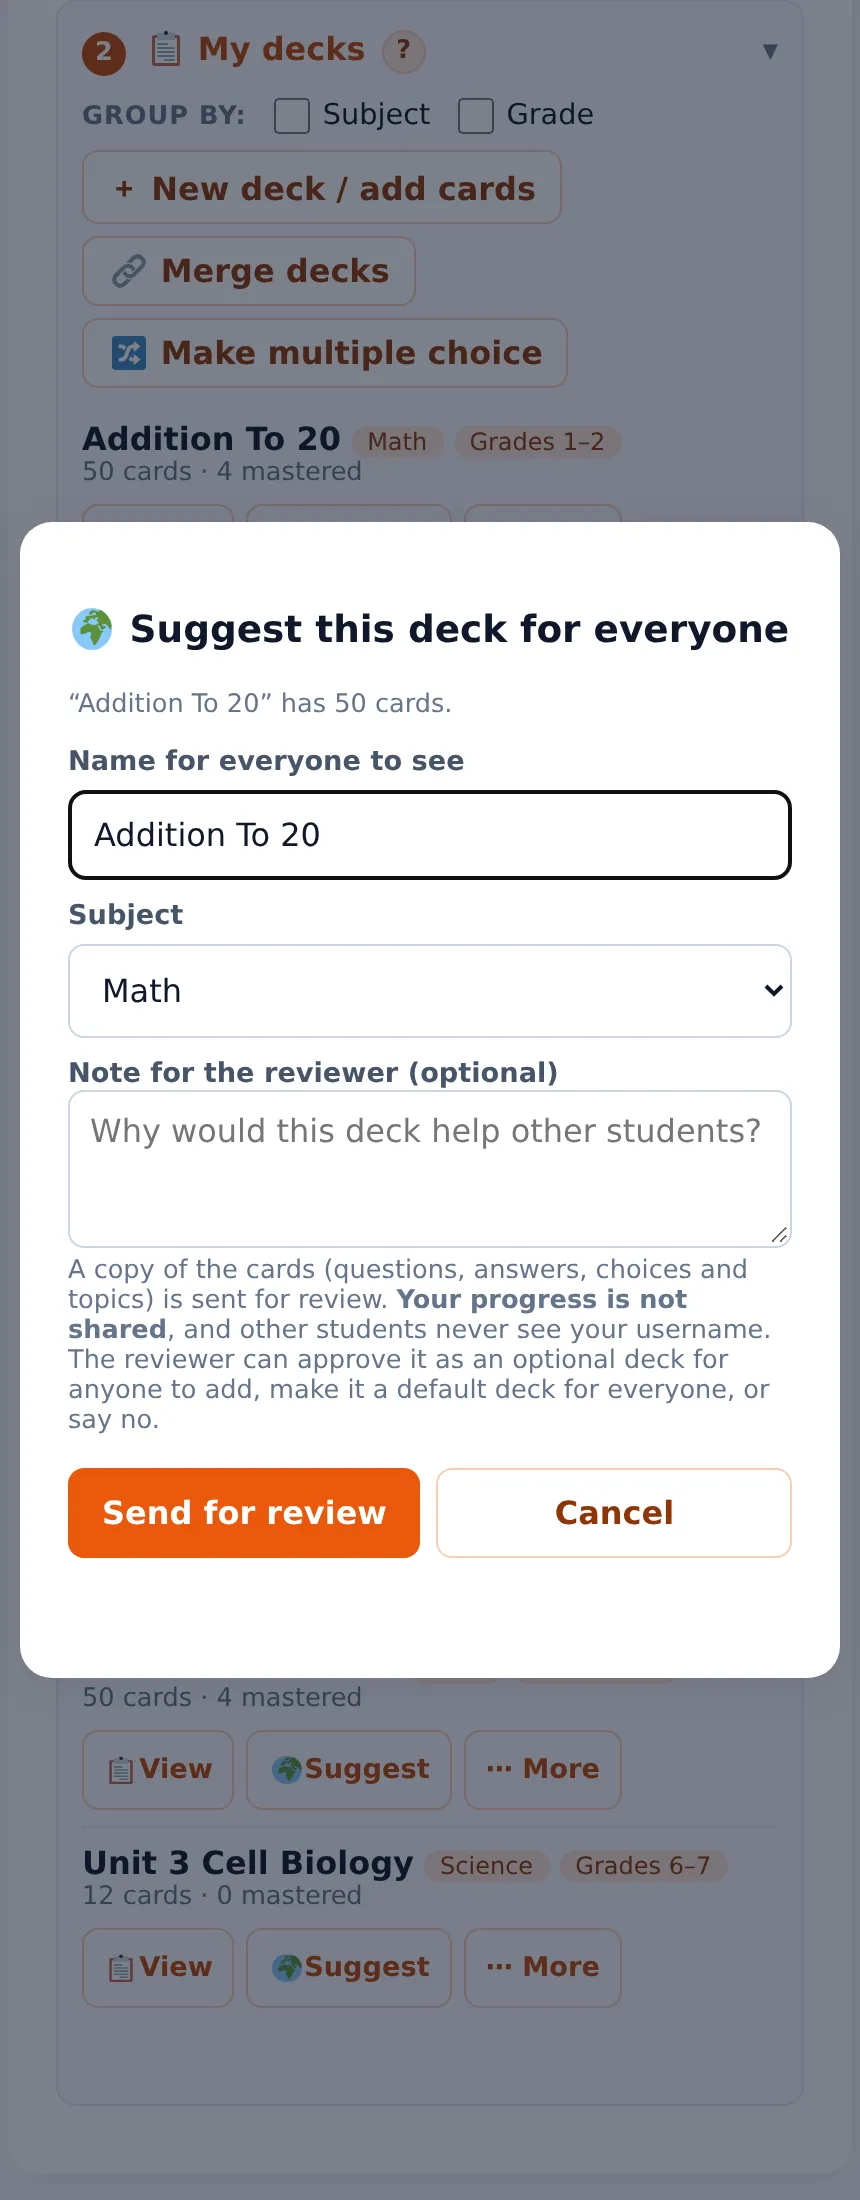
- A copy of the cards (questions, answers, choices and topics) is sent for review. Your progress is not shared, and other students never see your username.
- The reviewer can approve it as an optional deck (it appears in Add a deck from the library → Public Decks for anyone to add), make it a default deck (everyone gets a copy), or say no and tell you why.
- The deck shows its status: waiting for review, approved, or not accepted with the reason. While it is waiting you can Withdraw it. If it was not accepted you can fix the deck and suggest it again.
- Changes you make to your deck afterwards do not change the copy that was sent.
- You can have up to 10 decks waiting for review at once. Suggesting needs an internet connection.

Making and adding decks
Add a ready-made deck from the library (section 1). To make your own, tap + New deck / add cards above the list (see New deck / add cards). 🔗 Merge decks and 🔀 Make multiple choice are buttons there too.
Add a deck from the library
Where: My Cards → Decks → ① Add a deck from the library, or tap 📚 Add a deck from the library under the Active Deck picker on the Study screen.
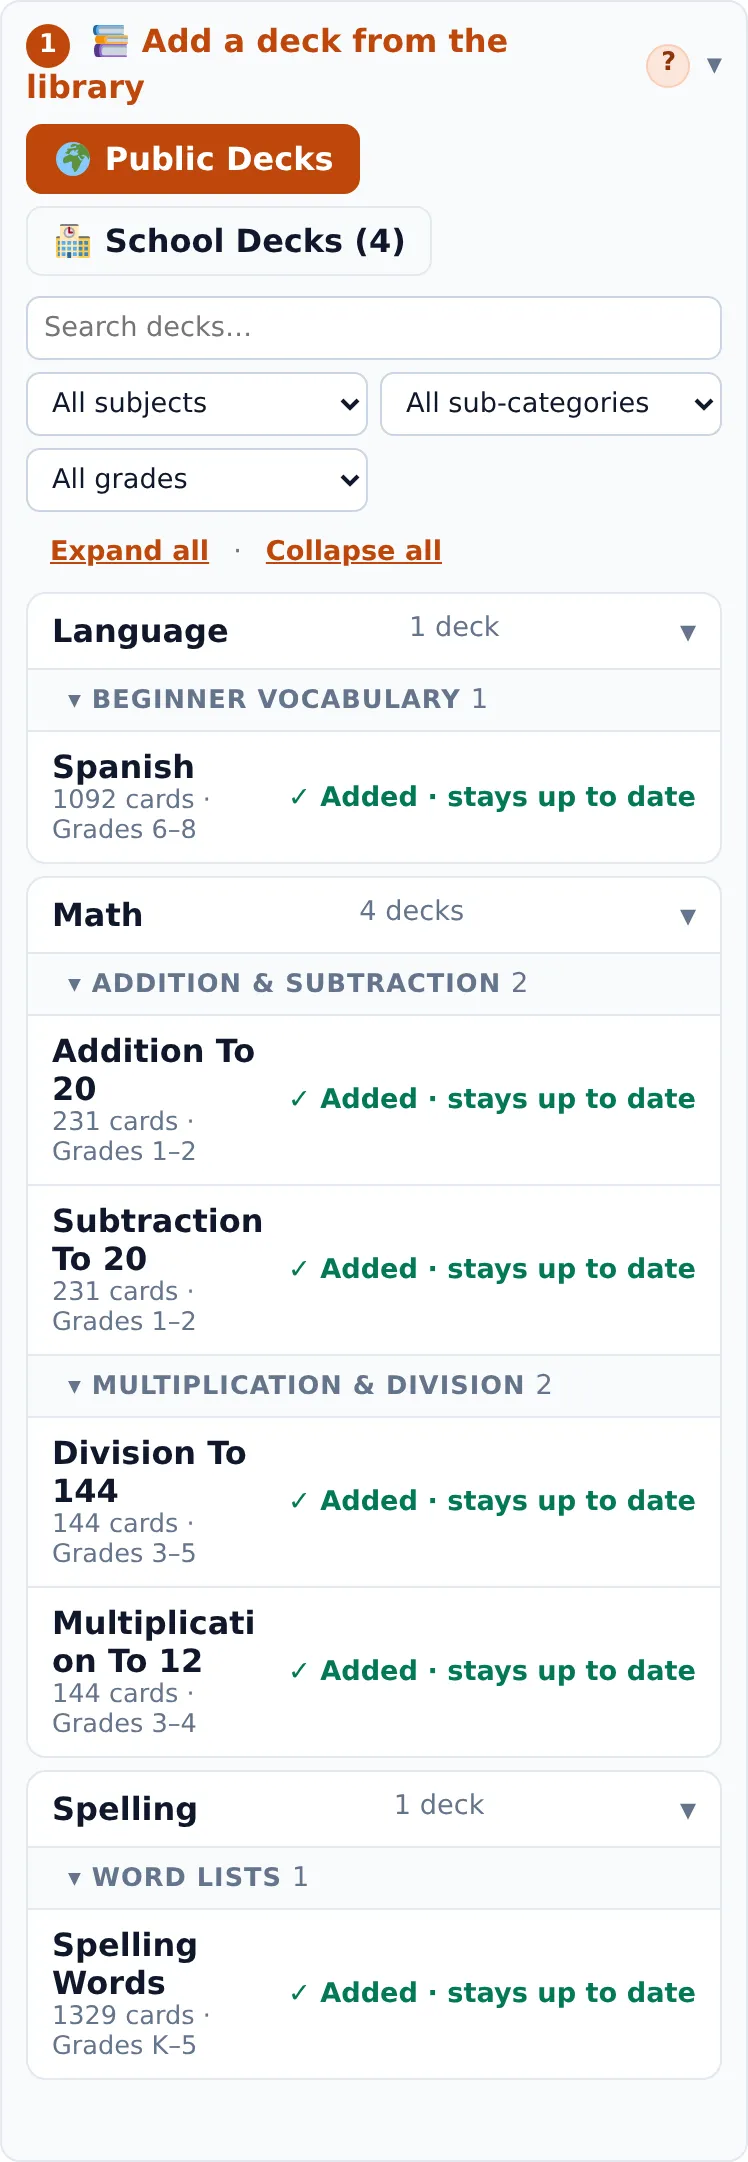
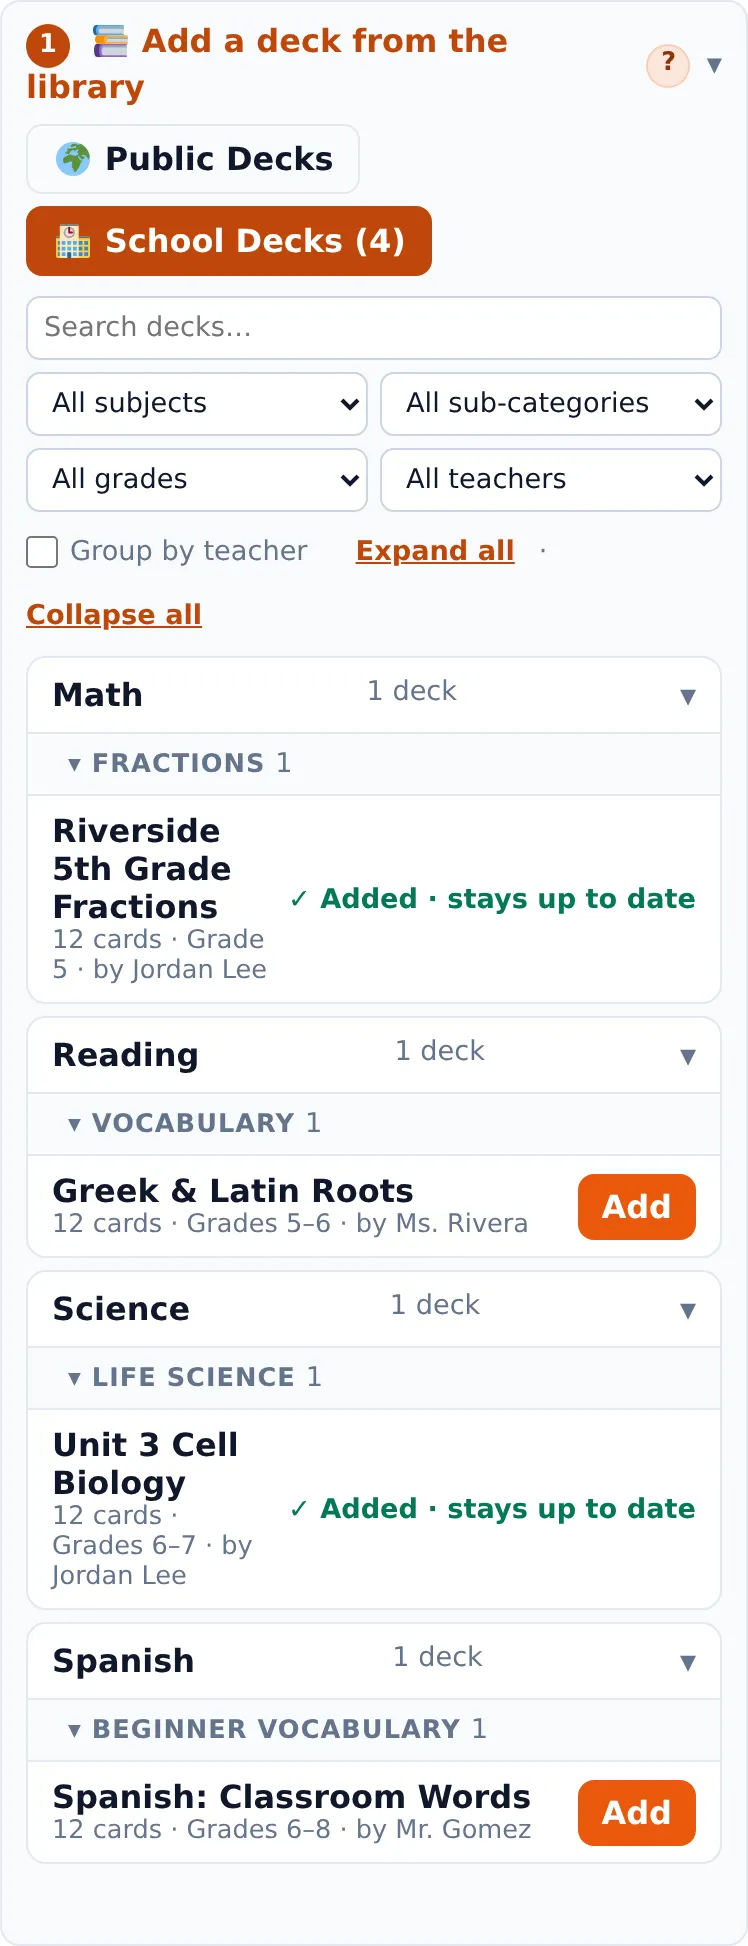
- 🌍 Public Decks are ready-made decks for everyone. If you are part of a school, a second tab 🏫 School Decks shows the decks your school's teachers and admins shared. Only people at your school can see those.
- Narrow the list with the search box and the Subject, Sub-category and Grade menus (the last two appear when decks have them). A deck with no grade set shows for every grade.
- On the School Decks tab there is also a Teacher menu, and the search box finds teacher names. Tick Group by teacher to see each teacher's decks together (the subject then shows inside each teacher's group), and every school deck shows who shared it.
- Decks are grouped by subject, then by sub-category. Tap a group to open or close it, or use Expand all and Collapse all (Collapse all leaves just the subjects).
- Tap Add on a deck. It is copied into My decks, and a message offers Study it now. If you already have some of its cards they are skipped.
- Decks stay up to date by themselves. When new cards or fixes are added to a deck you have, they arrive in your copy automatically, with your progress kept. The app checks when you open it, when you come back to it, and every 10 minutes, and says “Your library decks were updated with new cards.” There is no Update button to press.
New deck / add cards
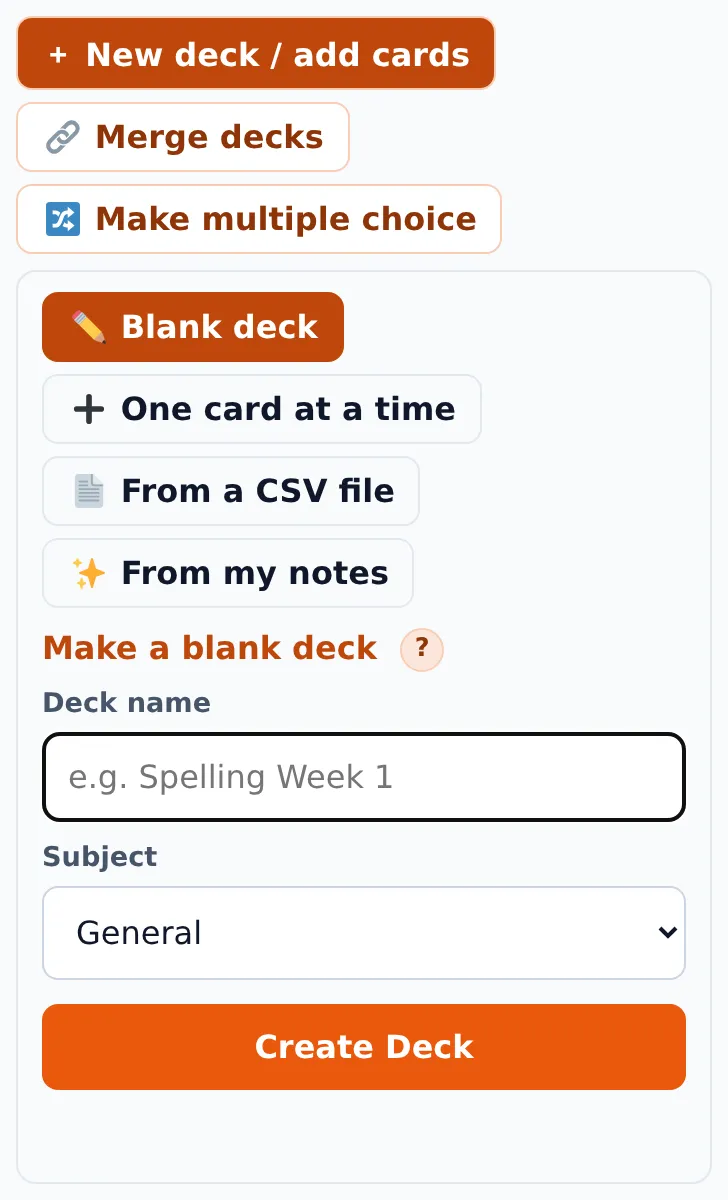
Where: My Cards → Decks → ② My decks, the buttons above the list. Tap + New deck / add cards and choose how:
| Choice | What it does |
|---|---|
| ✏️ Blank deck | Makes an empty deck with a name and a subject. Afterwards it switches to One card at a time with the new deck chosen, so you can add its first cards. |
| ➕ One card at a time | The Add a Card form. |
| 📄 From a CSV file | Import a spreadsheet of cards. |
| ✨ From my notes | Make flashcards from a PDF or photos of your notes (AI add-on). |
The other two buttons open Merge decks and Make multiple choice right under the list. Tap a button again to close its box. The same two actions are in each deck's ⋯ More menu, with that deck already chosen.
Your school's own decks
A teacher or school admin can share their own decks with the whole school. Open the 👤 menu → 🏫 Share decks with my school (or School decks in the top bar on the website).
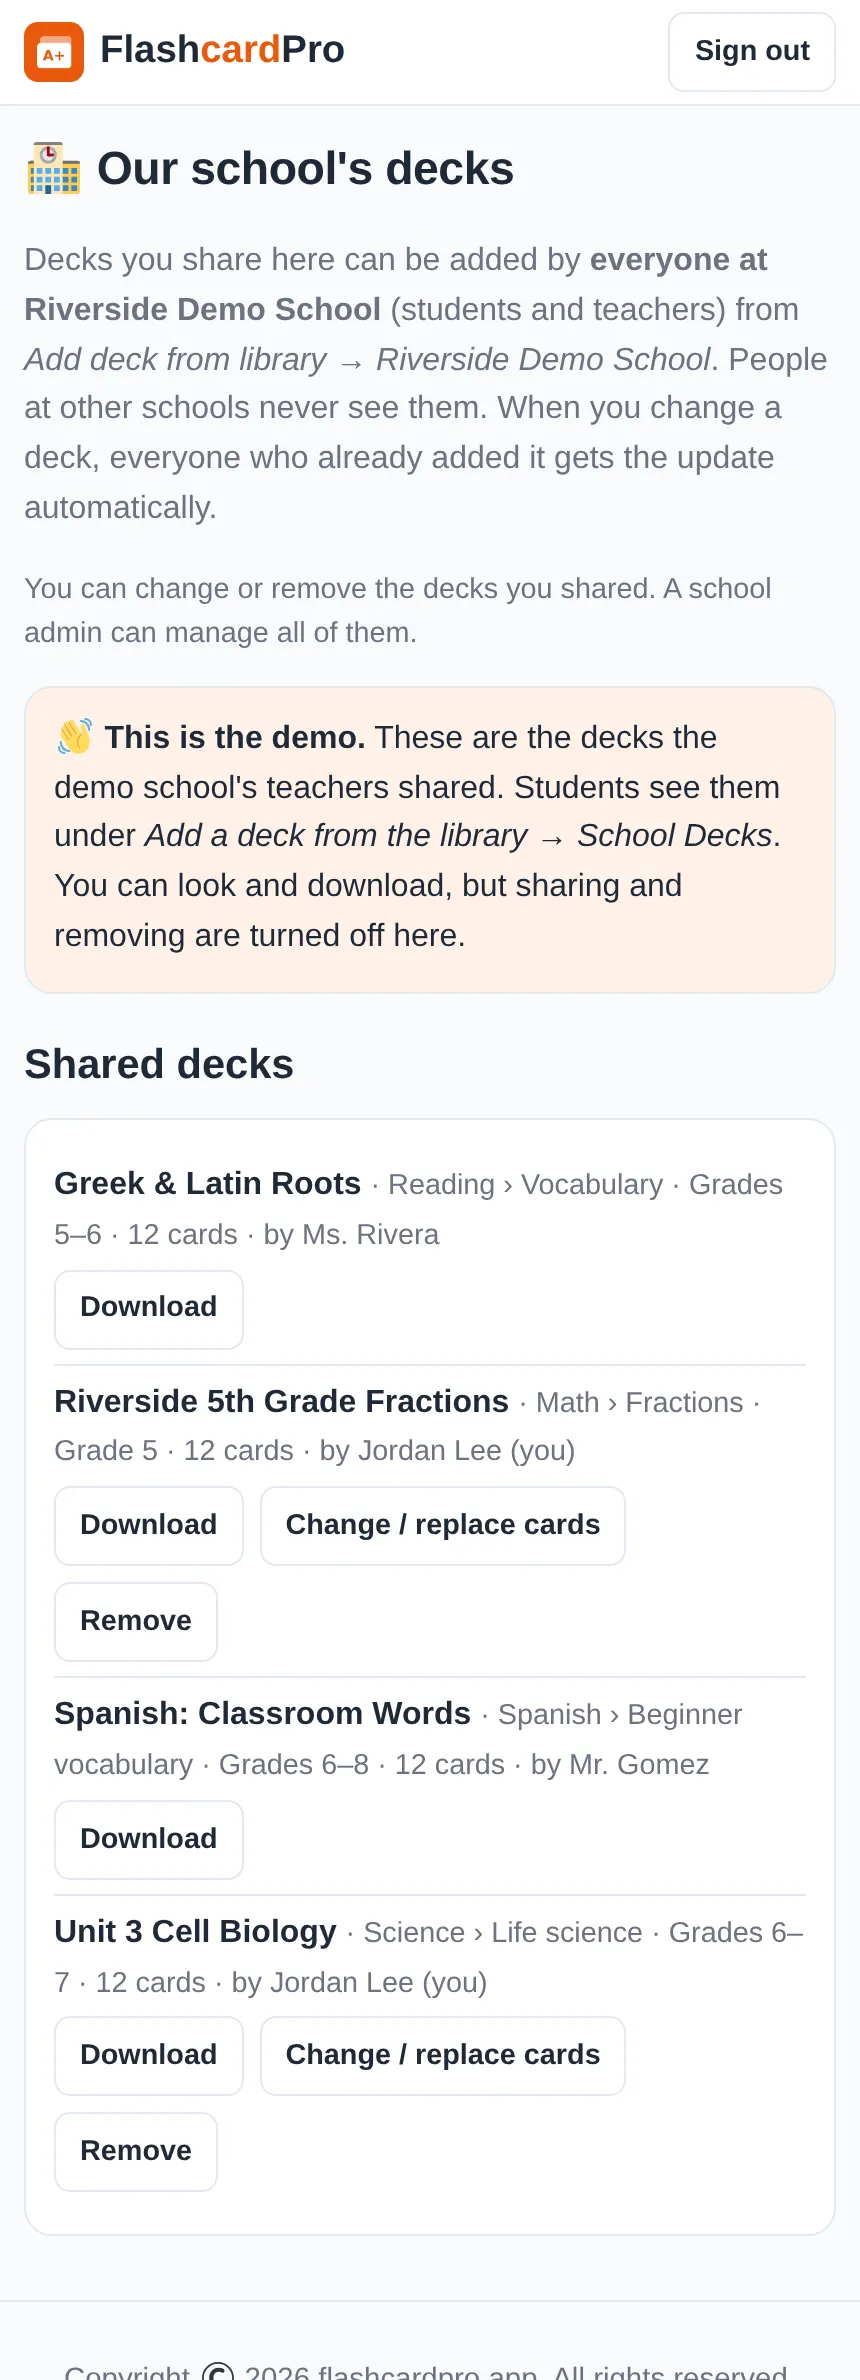
- Give the deck a name, a subject and, if you like, a sub-category and grades.
- Choose a CSV file (question and answer columns; the same format as importing a CSV) and tap Share this deck.
- Everyone at your school (students and teachers) sees it under Add a deck from the library → 🏫 School Decks. Nobody at other schools can.
- Change or replace a deck by tapping Change / replace cards and choosing a new file. Everyone who already added it gets the update automatically, with their progress kept.
- Teachers can change or remove only the decks they shared. School admins can manage all of them.
- Remove stops sharing a deck; students who already added it keep their copy.
- A school deck cannot use the name of a public library deck. A school can share up to 100 decks and 30,000 cards.
View Deck
See every card in a deck in one list. It works offline.
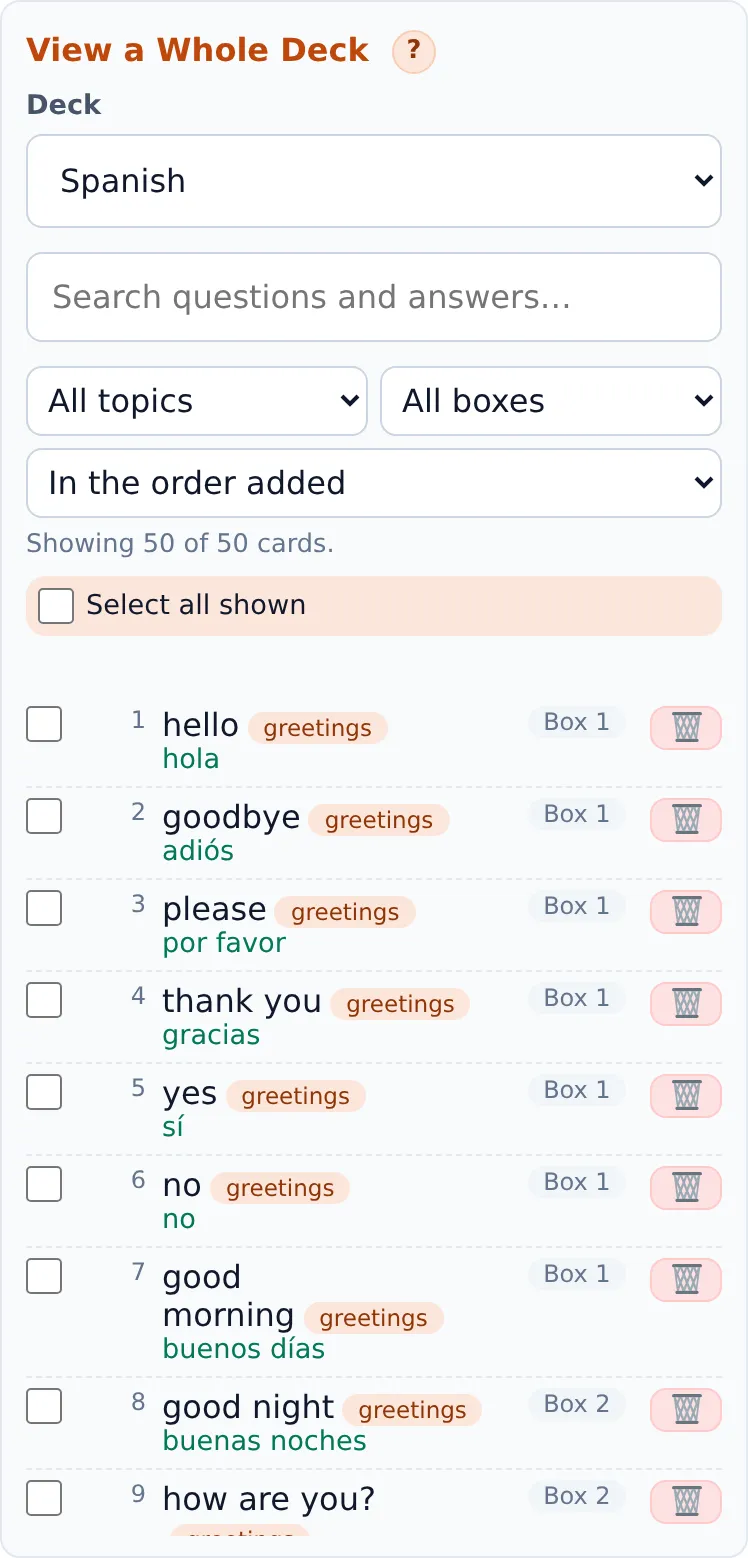
- Search looks in questions, answers and topics, so you can check whether a card already exists.
- Filters: by topic, by box, and an order (as added, by topic in book order, or by box).
- The list shows 100 cards at a time; tap Show more for the rest.
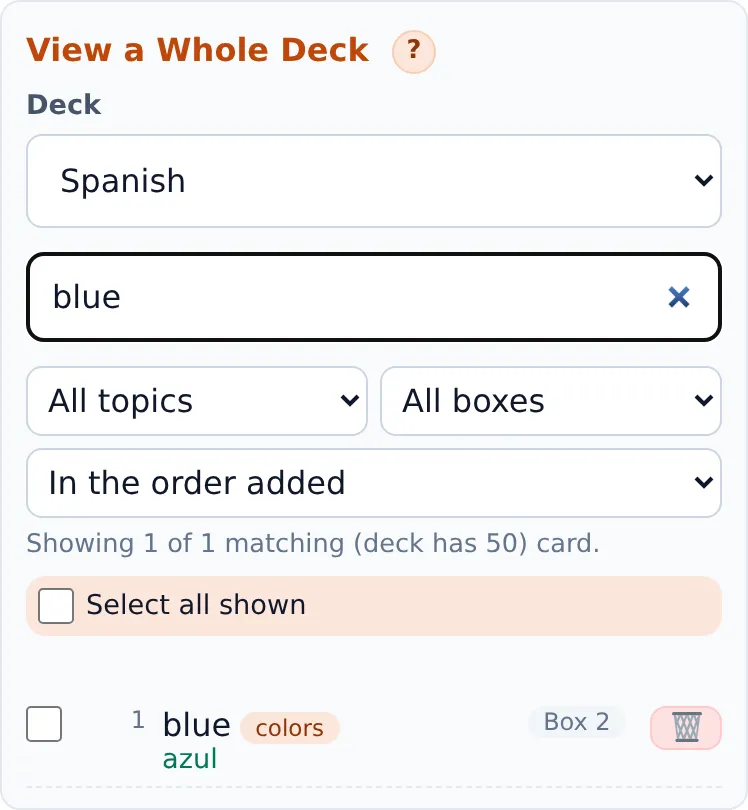
Delete cards
- Tap the 🗑 next to a card to delete just that card.
- Or tick several cards (or Select all shown) and tap 🗑 Delete selected.
- It asks you to confirm. Afterwards a message at the bottom of the screen has an Undo button for a few seconds. You can also use ↩ Undo on the deck (in the Decks tab) later.
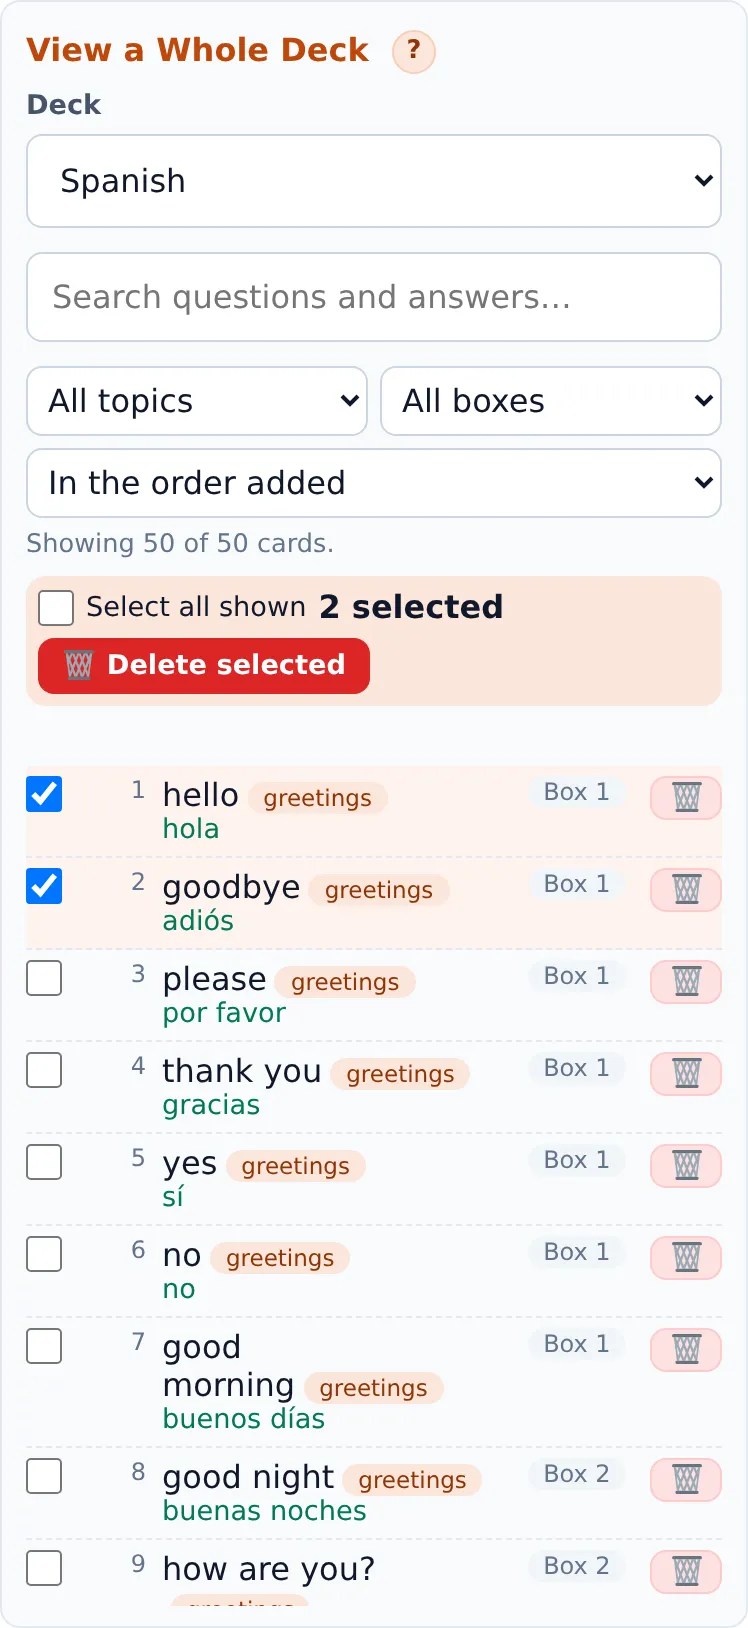
Adding one card at a time
Add a card
Where: + New deck / add cards → ➕ One card at a time.
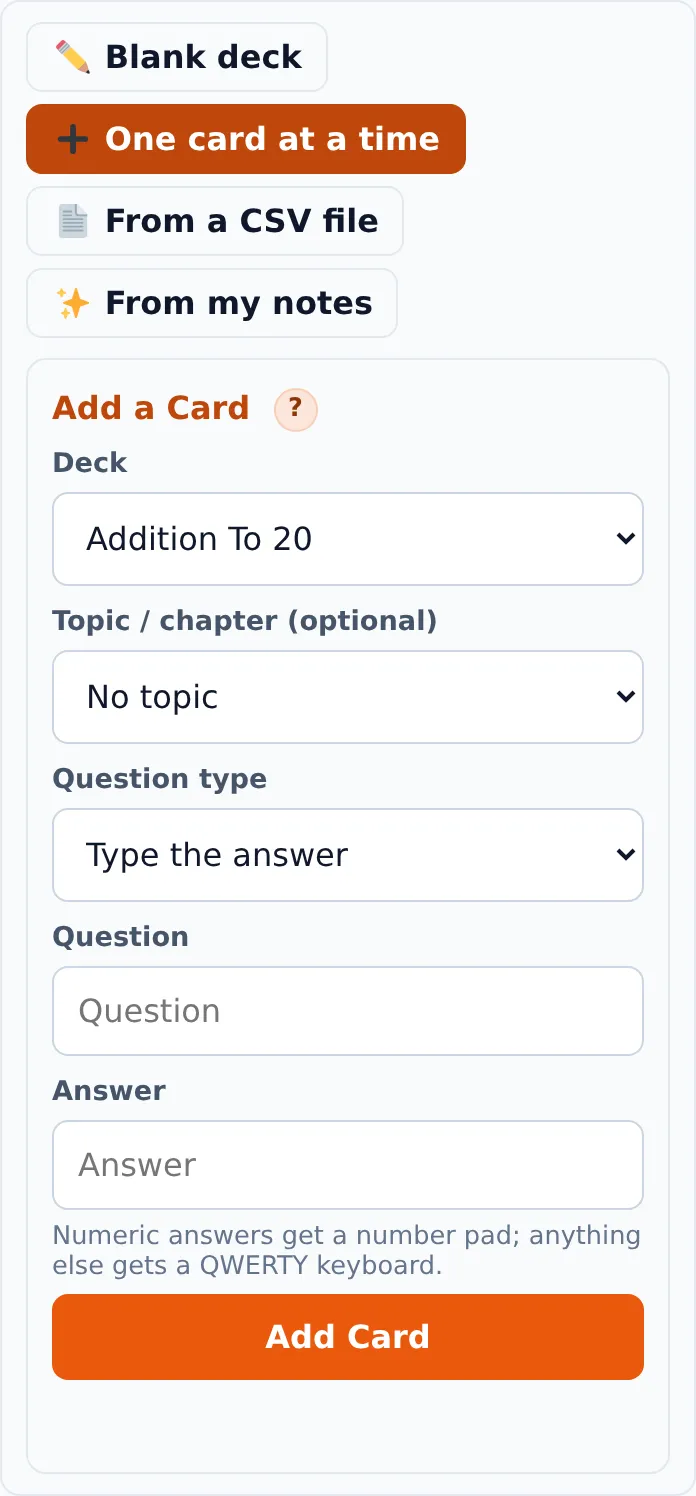
- Choose the Deck. It starts as the deck you have selected in Study, and you can pick another.
- Optionally type a Topic / chapter, such as “Endocrine System”. More
- Choose the Question type and type the Question and Answer. Tap Add Card.
| Question type | How to fill it in |
|---|---|
| Type the answer | A question and its answer. |
| Multiple choice | Question, the right answer, and wrong choices separated by |, like London | Rome | Berlin. |
| Fill in the blank | Write the sentence with ___ where the word goes, or put the answer in square brackets: The sky is [blue]. |
Duplicate check
As you type a question, cards already in the deck that look the same appear under it, so you can see whether it already exists.
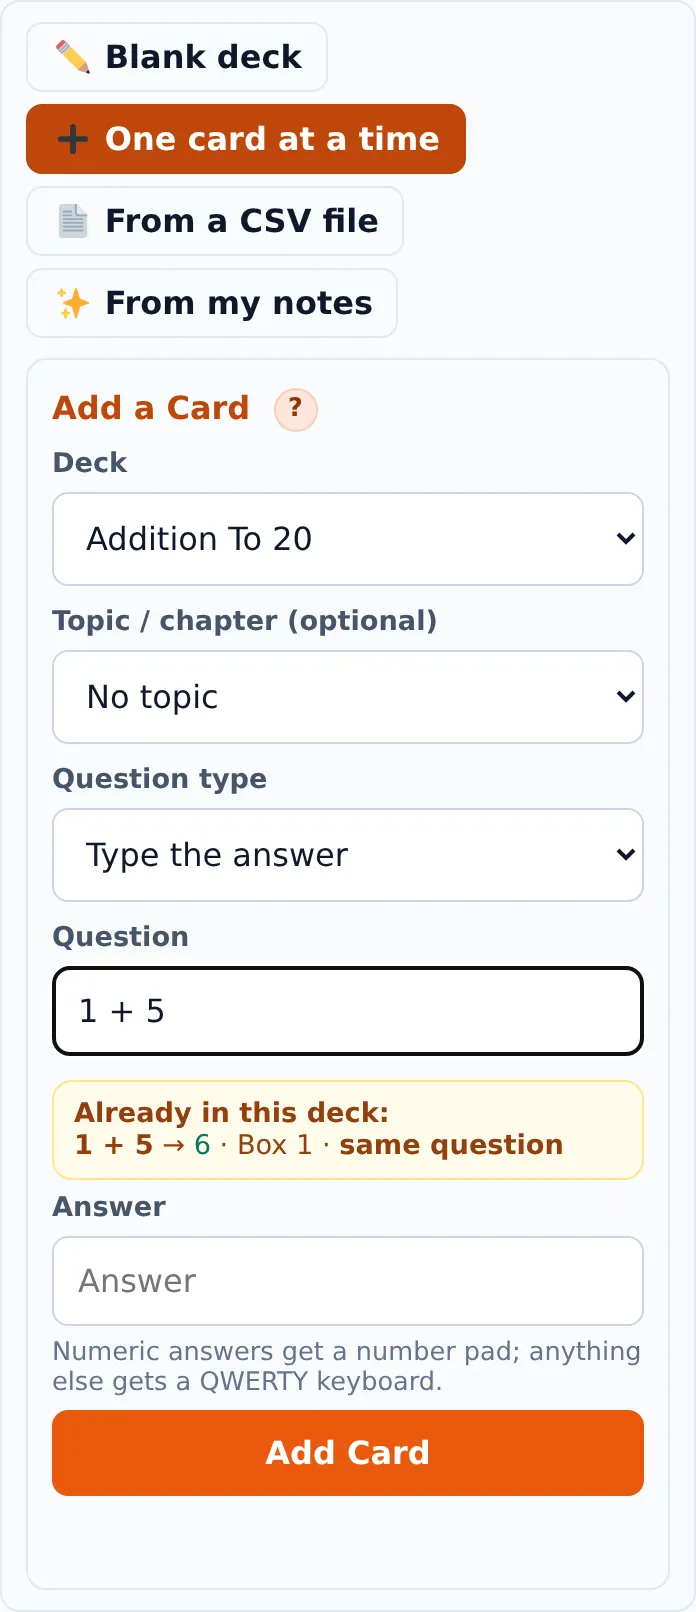
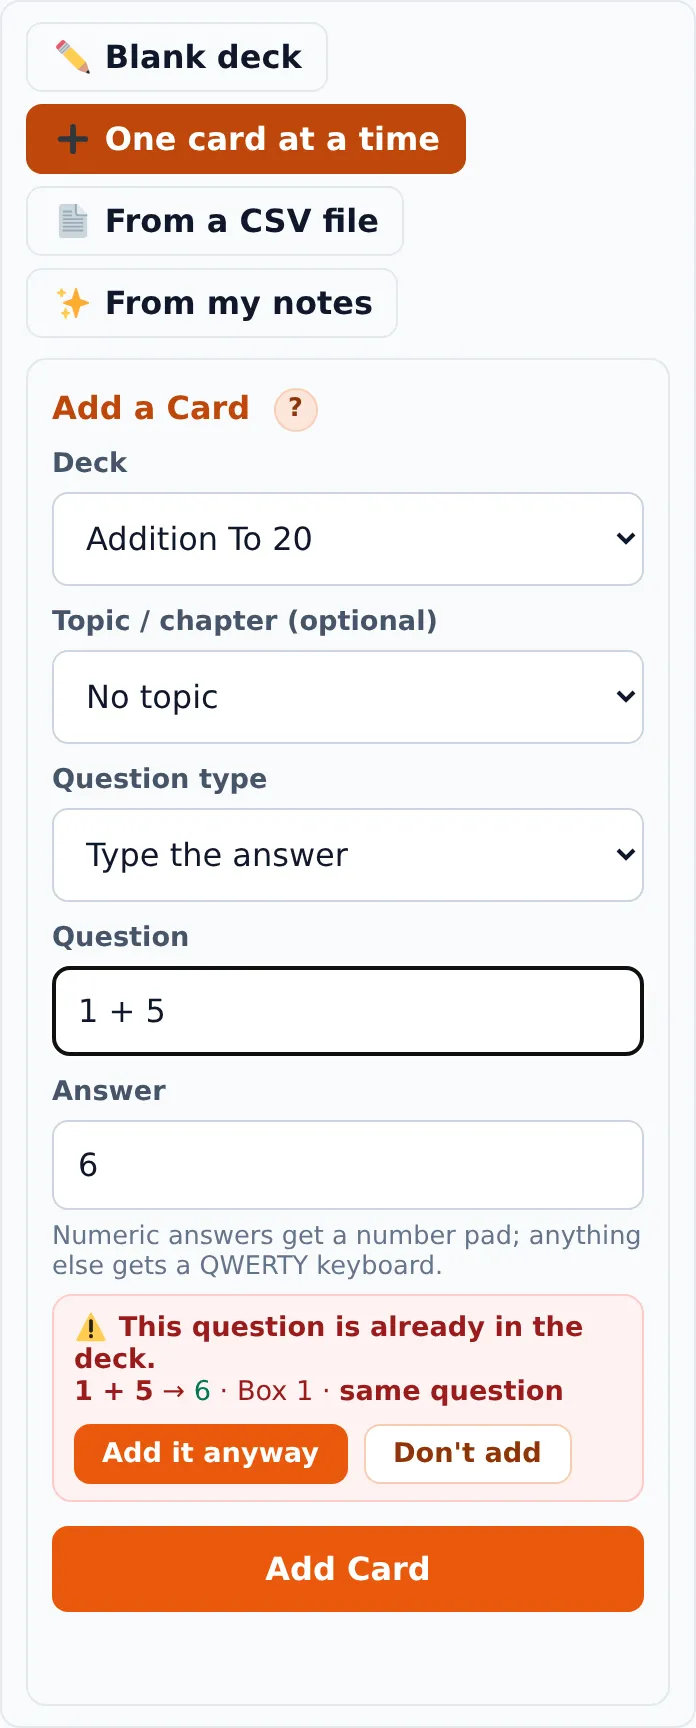
If you tap Add Card and the same or a similar card is already there, the app stops and warns you first. Choose Add it anyway or Don’t add. Capital letters and punctuation do not count as differences, and “6 + 7” counts as the same as “7 + 6”.
Importing a CSV file
A CSV is a spreadsheet saved as “CSV”. It is the quickest way to add many cards at once. Tap + New deck / add cards → 📄 From a CSV file.
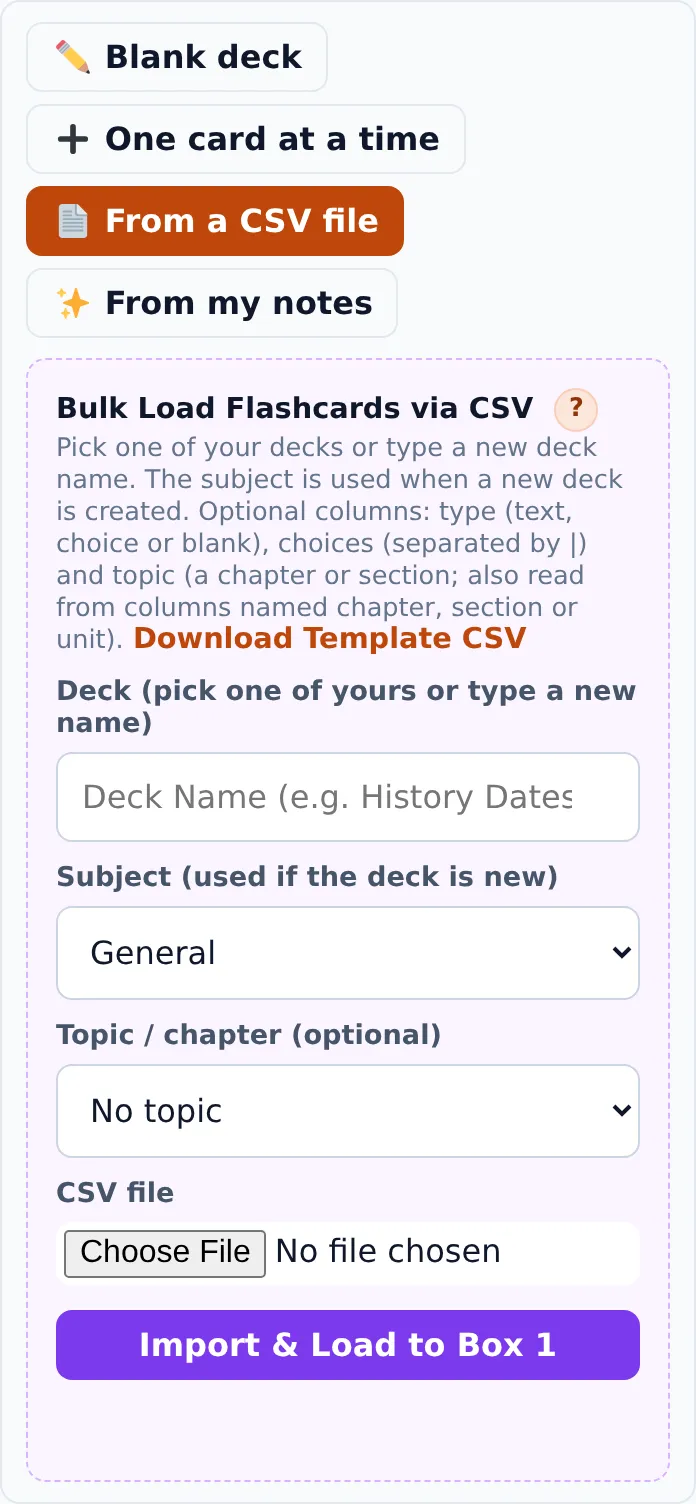
- Tap Download Template CSV to get an example file, and fill it in.
- Choose the deck (or type a new deck name), the subject, and optionally a topic for these cards.
- Choose the file and tap Import & Load to Box 1.
Columns
| Column | |
|---|---|
question | Required. |
answer | Required. |
type | Optional: text (type the answer), choice (multiple choice) or blank. |
choices | Optional: wrong answers separated by |, for multiple choice cards. |
topic | Optional: a chapter or section. Columns named chapter, section or unit work too. A topic typed in the import box is used for rows that have none. |
box | Optional (1 to 5). Cards without a box go in Box 1. |
question,answer,type,choices,topic
What does insulin control?,Blood sugar,text,,Endocrine System
Which gland is the master gland?,Pituitary,choice,Thyroid|Adrenal|Pancreas,Endocrine System
The brain is part of the ___ nervous system.,central,blank,,Nervous System
Topics (chapters)
A topic is like a chapter of a book. A deck called Anatomy could have the topics Endocrine System, Nervous System and Skeletal System. Once cards have topics you can study one topic at a time from Split Deck → By topic.
Giving cards a topic
- When you add a card, type its topic.
- In a CSV, use a
topiccolumn (or the topic box when importing). - When you make cards from a PDF or photos, you can type a topic for the new cards.
- For cards that already exist, use Topics in a Deck (below) or the AI topic suggestions.
Topics in a Deck (Topics tab)
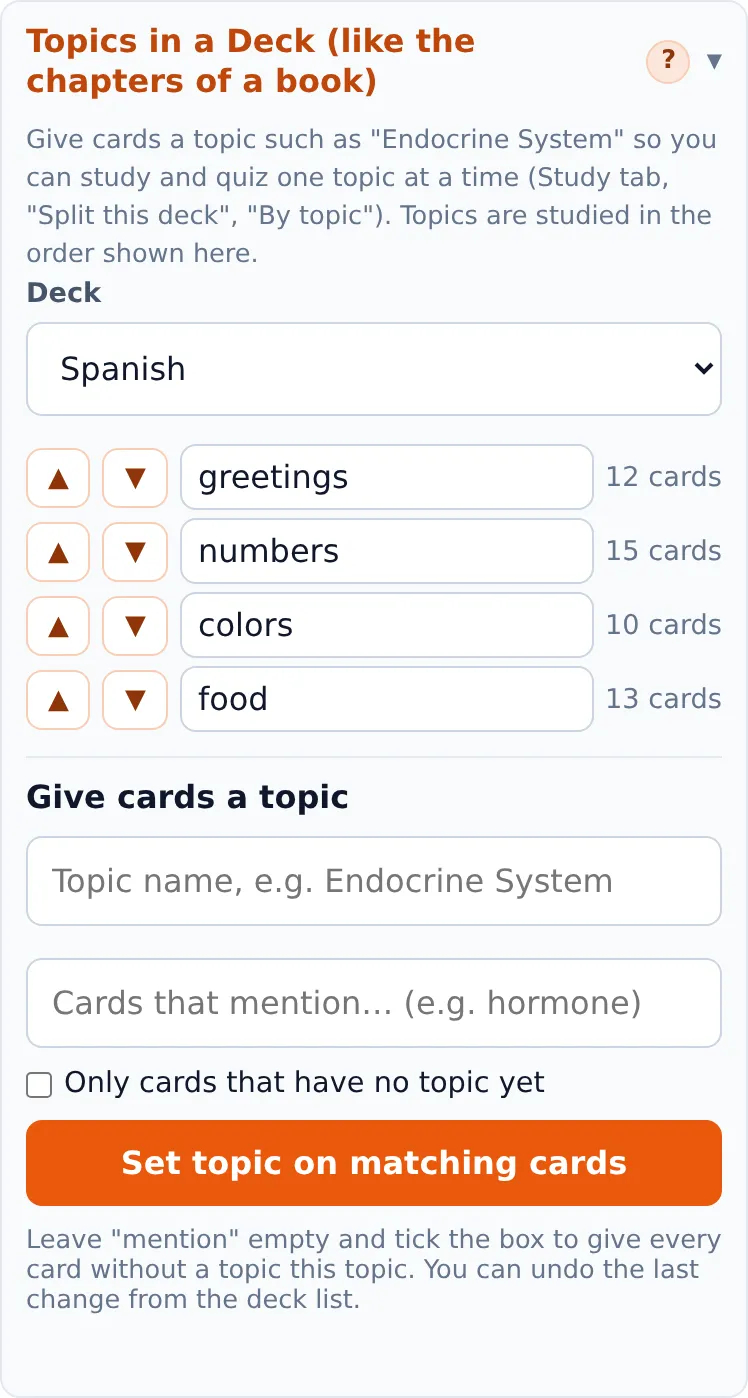
Choose a deck to see its topics, with how many cards are in each.
- ▲ ▼ put the topics in the order you want to study them, like the chapters of a book.
- Change the name and leave the box to rename a topic. Renaming it to a name that already exists joins the two. Clearing the name removes the topic from those cards.
- Give cards a topic: type the topic, then either a word the cards mention (for example “hormone”) or tick Only cards that have no topic yet, and tap Set topic on matching cards.
Topic changes can be undone with ↩ Undo on the deck. You can also move single cards between topics by drag and drop in Split Deck.
AI helpers: where to find them
Three helpers use AI, and each one sits next to the thing it changes:
| Helper | Where it is |
|---|---|
| Make Flashcards from Your Notes (PDF or photos) | + New deck / add cards → ✨ From my notes, because it makes new cards. |
| Suggest topics with AI | Topics tab, inside Topics in a Deck, because it sets the topics. |
| Make Existing Cards Multiple Choice | My decks: the 🔀 Make multiple choice button above the list, or a deck's ⋯ More menu. |
They are a paid add-on (no free trial): a school or a student on their own adds them from the billing page. If you see “The AI tools are a paid add-on”, tap Add them here, or ask your school admin. You can do up to 10 AI uploads a day. Nothing is saved until you have looked at it and approved it.
Make Flashcards from Your Notes (PDF or photos)
Where: + New deck / add cards → ✨ From my notes.
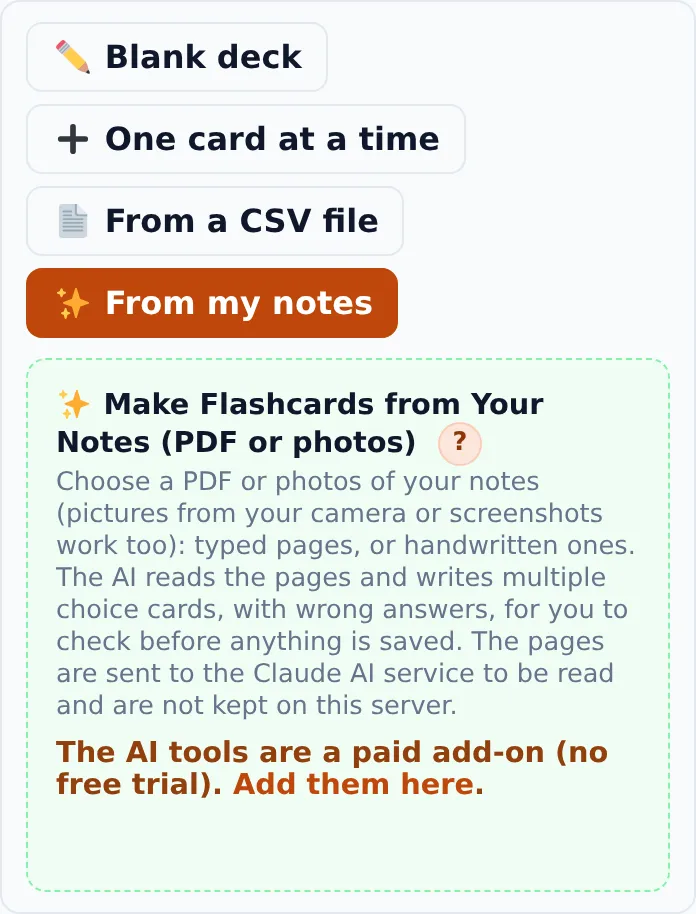
- Choose a PDF or one or more photos of your notes (JPG, PNG, GIF or WebP; on a phone you can take a picture or pick one from your photos). Typed pages and handwritten ones both work. You can mix PDFs and photos, up to 10 files and 40 pages at a time (a page is one photo or one page of a PDF). The line under the button shows how many pages you have left this month.
- Choose the deck to add the cards to. It starts as the deck you have selected in Study; pick any other deck from the list, or choose New deck… and type a name (leave it empty and the AI suggests one) and a subject. Choose about how many cards you want.
- Tap Read my notes and make cards. The AI reads the pages and writes multiple choice cards with wrong answers.
- Check the cards. Each card comes with a topic chosen by the AI. It uses the deck's own topics where they fit and suggests new ones (marked “new”) only when needed. Change any card's topic from its drop-down, choose No topic, or choose Other… to type your own. You can also change the deck in Save to deck. Untick any card you do not want and fix any wording, then save. Nothing is saved until you do.
Merge Decks
Where: the 🔗 Merge decks button above My decks, or ⋯ More → Merge with other decks on a deck (that deck is already ticked).
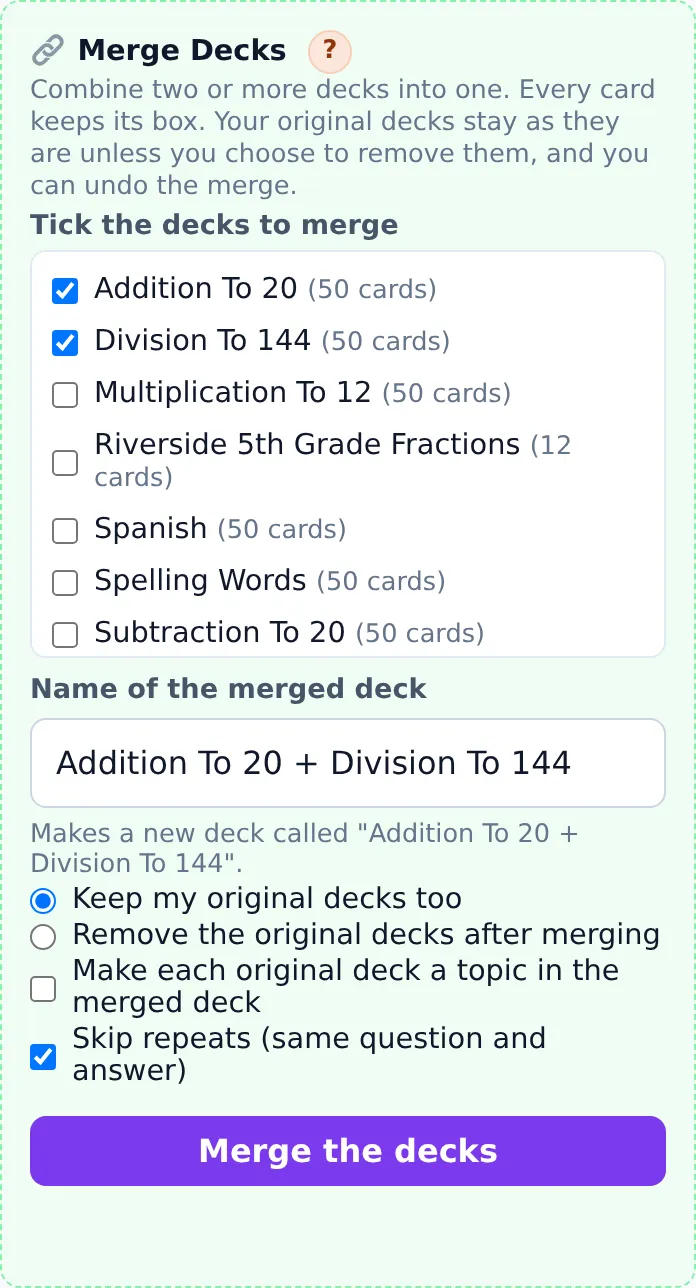
Merging puts the cards of two or more decks into one deck. Every card keeps the box it is in, so you do not lose your progress.
- Tick the decks you want to combine (at least two).
- Check the name. It starts as the deck names joined together, and you can type your own. If you type the name of one of the ticked decks, the other decks are added into that deck instead of making a new one.
- Choose Keep my original decks too (the safe choice) or Remove the original decks after merging.
- Optional: Make each original deck a topic, so you can study one old deck at a time with Split Deck. Skip repeats leaves out a card when the same question and answer are already there.
- Tap Merge the decks. A box tells you how many cards you will get and which decks (if any) will be removed. Say OK to go ahead.
Make Existing Cards Multiple Choice
Where: the 🔀 Make multiple choice button above My decks, or ⋯ More → Make multiple choice on a deck (that deck is already chosen).
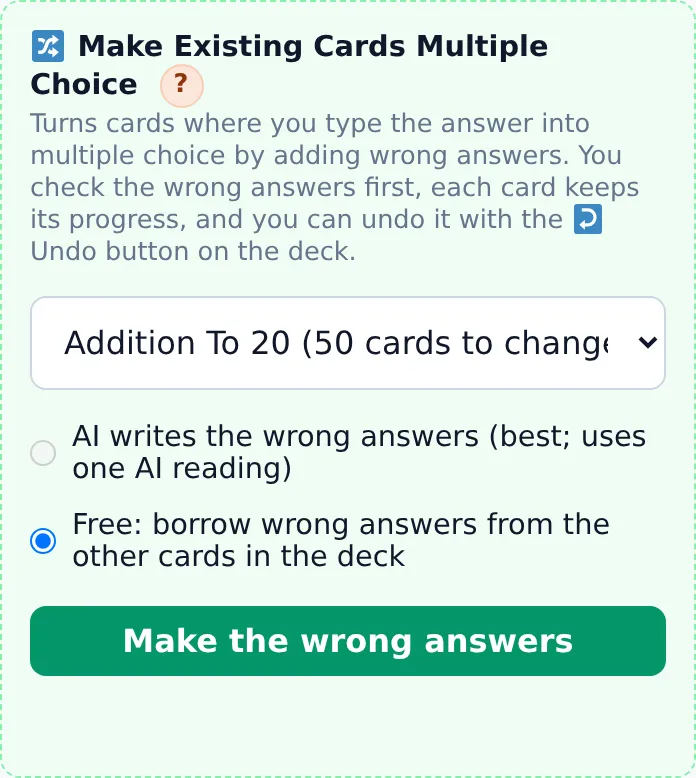
This turns cards where you type the answer into multiple choice by adding wrong answers. Pick a deck and a method:
- AI writes the wrong answers (best quality; uses one AI reading).
- Free: borrow wrong answers from the other cards in the deck. This works best in a larger deck.
You see the proposed wrong answers first and can edit or untick cards. Each card keeps its box and progress. ↩ Undo on the deck puts it back. About 60 cards are done at a time; run it again for the rest.
Suggest Topics for a Deck
Where: the Topics tab, inside Topics in a Deck, under the topic list. It uses the same deck you picked at the top of that panel.
The AI reads your questions and answers and suggests topics, like the chapters of a book, and which cards go in each. You are in control: nothing is saved until you tap Apply.

- Choose the deck. Pick Only cards that have no topic yet (the AI reuses the topics you already have) or All cards (sort the whole deck again).
- Tap Suggest topics and wait a moment.
- Review the result: rename topics, move them with ▲ ▼ into the order you will study them, and use the drop-down next to any card to put it in a different topic.
- Tap Apply these topics (or Cancel to change nothing). ↩ Undo on the deck brings the old topics back.
Up to 250 cards are looked at each time. If your deck is bigger, apply these and run it again for the rest.
Working offline
The app keeps a copy of your decks on your device, so you can study without internet. When you are offline a notice at the top says so.
| Works offline | Needs internet |
|---|---|
| Opening the app and signing in (on a device you have used before) Quiz and Study Mode Split Deck, Quiz Style, the timer View Deck (search and filters) Making a blank deck | Signing in on a new device Adding cards (one at a time, CSV or notes) The Topics tab and the AI helpers Merging decks and making cards multiple choice Deleting cards, downloading or replacing a deck Adding a library deck (public or school) |
Your answers are saved on the device and are sent to your profile when you are back online (the notice shows how many are waiting). Open the app once with a connection after changes on another device so your device copy is up to date.
Suggest a feature or report a problem
- 💡 Suggest a feature: tap your name (👤) → Suggest a feature. Say what you would like. Everyone can see the list (never who asked), and you can +1 ideas you want too. We build the most wanted ones first, and email you when yours is added.
- 🐞 Report a problem: tap your name → Report a problem. Pick where it happened, say what went wrong, and send. Only the FlashcardPro team sees it. You can see your reports and their status on that page, and we email you when it is fixed.
- You can send a few of each per day. If you cannot sign in, you can still report a problem from the sign-in help: add your name and email so we can write back.
Questions and fixes
A teacher added new cards. How do I get them?
You do not need to do anything. Decks from the library or from your school update by themselves, with your progress kept. If you do not see them yet, close and reopen the app, or wait a few minutes. See Add a deck from the library.
It says my account is locked for 10 minutes.
That happens after 5 wrong passwords in a row, to keep accounts safe. Wait 10 minutes and try again, or use Forgot password.
I do not see my school's decks.
The 🏫 School Decks tab under Add a deck from the library only appears when you are part of a school. If it is empty, your school has not shared a deck yet: ask a teacher or your school admin to share one.
Where did “Add Cards”, “New Blank Deck” and “Merge Decks” go?
They moved under My decks. Tap + New deck / add cards (blank deck, one card at a time, CSV or notes), 🔗 Merge decks or 🔀 Make multiple choice above your deck list. See New deck / add cards.
Where did Sign Out go?
Tap your name at the top (👤) and choose Sign out.
I forgot my password.
On the sign-in screen tap Forgot your password? and type your email. We email you a link to choose a new one. See Forgot your password?. If your account has no email, ask your school admin to set a new password.
The reset email did not arrive.
Wait a few minutes and check the spam or junk folder. Make sure you typed the email you signed up with. You can ask again, but only a few times an hour. If it still does not come, ask your school admin.
The reset link says it expired or was already used.
Links work once and for one hour. Go back to the sign-in screen and tap Forgot your password? again for a new one.
The app looks old or something I was told about is missing.
Close the app and open it again, or refresh the page. An installed app updates itself the next time it opens with a connection.
It says “Please sign in again”.
Your sign-in expired. Sign in again; anything you answered offline is sent to your profile then.
My deck is empty or says “Deck Empty”.
Add cards in Card Management (add one at a time, import a CSV, or add a library deck). If you are using Split Deck, make sure at least one piece has cards in it, or choose “Whole deck”.
I only see some of my cards when I quiz.
You probably have a split turned on. Look at the summary line (“✂️ …”) under the tabs, or open Split Deck and choose All pieces or Whole deck (no pieces).
“By topic” says “Add topics” instead.
That deck has no topics yet. Tap it and you are taken to the Topics tool for that deck. Give its cards a topic (or use Suggest Topics), then go back to Split and tap By topic.
“By number table” says no tables were found.
That split is for decks of cards written like 6 × 7 or 12 ÷ 3, where most of the deck is arithmetic. Use a number, size or topic split for other decks.
I suggested a deck. What happens now?
It waits for the reviewer. Look at the deck in Card Management → Decks: it will say approved (it is now in the library for anyone to add, or it became a default deck) or not accepted with a reason. You can withdraw it while it is waiting. Nothing about your own copy of the deck changes.
I deleted cards or changed a deck by mistake.
Go to Card Management → Decks and tap ↩ Undo on that deck. It brings back the last bulk change (delete, replace, make multiple choice, topic changes). Only the most recent change can be undone, so do it right away.
The app will not let me add a card.
If a red warning appears, a same or similar card is already in the deck. Choose Add it anyway if you really want it. Otherwise check that the question and answer are filled in, and that a fill-in-the-blank has ___ or a word in [brackets].
The AI tools say they are a paid add-on.
The AI tools are a paid add-on with no free trial. Tap Add them here to buy them (a school admin does it for a school), or ask your school admin. If they say “paused”, the AI account needs more credit; try again later.
It says I have too many pages, or none are left this month.
Notes are limited to 40 pages per upload and a monthly allowance of pages (about 250 for a student on their own, about 3,000 for a school). Upload fewer pages at a time, or wait for the 1st. A school admin can see how many pages the school has used on the Manage page.
Make cards from PDF says the file was already read.
The app remembers PDFs it has read for you so you do not use up your monthly pages by accident. You can choose to read it again if you want to.
I changed my split or style but another device does not show it.
Settings sync when the app is open with a connection. Open the app on the other device while online, and give it a few seconds.
Nothing happens when I tap a button.
Check for a notice at the top saying you are offline; some buttons need internet. If not, refresh the page.
Still stuck? Ask your school admin and tell them which screen you were on and what you tapped.